CPU and memory (RAM) are the two resources every container needs. Kubernetes resource management rests on two vital mechanisms enabling you to control the usage of CPUs and memory. Setting requests and limits helps to ensure cluster stability and performance, but it can also challenge your Kubernetes cost optimization efforts.

Read on to learn more about Kubernetes resource management and how to use limits and requests to your cluster’s advantage.
What are Kubernetes resource requests and limits?
Kubernetes resource management is no walk in the park. Someone once compared it to walking a tightrope – and it indeed can often feel like that when you try to balance the performance and cost-efficiency of resource allocation.
Requests and limits define the resources – CPU and memory – allocated to containers. Requests set the minimum needed for stable operation, while limits specify the maximum allowed.
A CPU request is the minimum number of CPUs a container needs. On the contrary, a CPU limit is the maximum number of CPUs a container can use and is the level where it can start throttling.
A memory request is the minimum memory amount a container needs to run, while a memory limit is the maximum a container can use to the level where the process gets killed.
How Kubernetes requests and limits work
If the node where a Pod is running has enough resources, the container can exceed the request value but can’t use more than its limit.
If you set a memory request of 256 MiB for a container in a pod scheduled to a node with 8 GiB of memory, then the container can try to use more RAM. With a memory limit of 4GiB for that container, the kubelet and container runtime will enforce the limit, stopping the container from using more than the specified value.
For example, when a process in the container tries to use more than the allowed amount of memory, the system kernel terminates the process with an out-of-memory (OOM) error.
You can implement limits reactively – the system intervenes in cases of violations—or by enforcing them—the system stops the container from exceeding the limit. Different runtimes can have different ways to implement the same restrictions.
Limits and requests bring a handful of other tangible benefits to your cluster. But before we dive into their advantages, let’s whizz through how Kubernetes CPU and memory work.
Zoom in on resource types in Kubernetes
CPU units
CPU is a compressible resource that you can expand to meet your workload’s particular needs. If processes request too much CPU, some of them may start to get throttled.
CPU is measured in cores, which represent computing processing time. Millicores (m) can be used to represent smaller amounts than a core – for example, 500m is half a core. The minimum amount of CPU that you can request is 1m. Nodes may have more than one core available, so requesting CPU > 1 is possible.
Limits and requests for CPU resources are measured in CPU units. In Kubernetes, 1 CPU unit is equivalent to 1 physical or virtual core, depending on whether the node is a physical host or a virtual machine running inside a physical machine. For more details on Kubernetes CPUs, please check the K8s documentation.
Memory
Unlike CPUs, memory is a non-flexible resource. When a process lacks sufficient memory, it may be terminated, in a process known as an “OOM killer”.
Limits and requests for memory are measured in bytes. You can express memory as a plain integer or a fixed-point number using one of these quantity suffixes: E, P, T, G, M, k. You can also use Ei, Pi, Ti, Gi, Mi, and Ki equivalents. For example, “Mebibytes” (Mi) denote 2^20 bytes.
The introduction of Mebibytes, Kibibytes, and Gibibytes aimed to prevent confusion with the metric system’s definitions of Kilo and Mega and ensure precise representation of memory sizes.
Why configure Kubernetes requests and limits
Here are a few key benefits of putting a cap on CPUs, and memory is worth your time.
First, as mentioned, limits and requests improve resource allocation. K8s uses them to allocate resources such as CPU and memory to containers running in a cluster. For example, setting a request of 1 CPU and a limit of 2 CPUs ensures that your container always has at least 1 CPU available and can use up to 2 of them, if necessary.
Second, requests and limits improve your container performance and help to prevent related issues. For example, setting too low a limit for a container’s CPU usage may cause the container to run slowly. A limit that’s too high may cause the container to consume too many resources, leading to cloud waste.
Third, setting proper requests and limits adds to your overall cluster stability. If your container has a limit that is too high for its memory usage, it may cause the node to run out of memory and crash.
And finally, adequately configured requests and limits optimize your cloud spend. By setting the right values, you can reduce the cost of running applications in Kubernetes. Limiting a container’s memory usage can help prevent overprovisioning resources, often resulting in unnecessary expenses.
What happens when you don’t set resource limits and requests correctly
We’ve already explained in broad strokes the importance of setting resource limits and requests. Let’s focus on situations when you don’t specify them or their values don’t match your cluster’s needs.
If you don’t specify resource limits, Kubernetes will use the default limit, which equals the value of CPUs or memory on the node or the Pod namespace. No default limit means that K8s will not restrict the Pod’s resource usage.
If you specify a resource limit but leave the request value blank, Kubernetes will set the request equal to the limit.
Suppose your actual usage of CPU and memory is below the requests. In that case, Kubernetes will allocate the requested resources to the container, allowing it to use more if necessary and available.
When CPU and memory usage are higher than requested but still below the limits, K8s will allow the container to use more resources than requested. However, it will still keep it below the specified limit.
When CPU and memory usage exceeds the limit, CPU throttling will start delaying response time, while exceeding the specified memory limit will terminate the container.
If CPU and memory requests are too big for your nodes, you can expect the Pod to remain in the PENDING state indefinitely, as you won’t be able to schedule the container due to insufficient resources on the nodes.
How to set the right requests and limits for a production app
Let’s say you have a K8s application running in a production cluster. Here’s how to identify and set the right values for its resource requests and limits.
containers:
  - name: "foobar"
    resources:
      requests:
        cpu: "300m"
        memory: "256Mi"
      limits:
        cpu: "500m"
        memory: "512Mi"
Step 1: Identify your current request and limit values
To identify optimal values, you first need to gather the following data:
- Current requests;
- Current limits;
- Historical resource usage over time – this you can collect with tools like a metric server, Prometheus, ELK stack, CAST AI Kubernetes cost monitoring, or others.
CAST AI’s cost reporting feature provides detailed information on your workload’s current and historical resource usage:
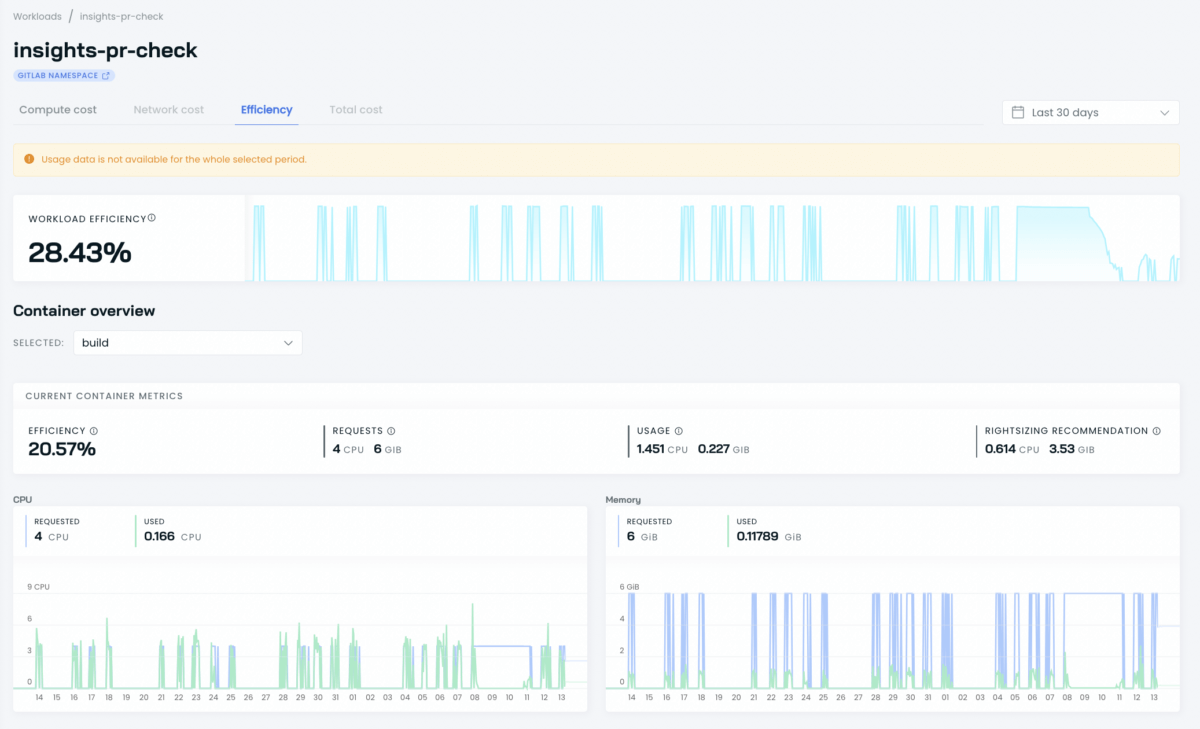
Once you have the above, you can expect some different scenarios:
1. Usage is lower than requests and limits

2. Usage exceeds requests but is lower than limits

Both scenarios are suboptimal, as in both you overcommit resources, which leads to waste. Let’s find a remedy for that.
Step 2: Identify optimal request and limit values
Once you know your current situation, it’s time to find more optimal values.
As a rule, you should set the request to X-value and leave headroom. The X-value can be a usage measure – 5th, 25th, 50th, 75th, 95th, and 99th percentile, minimum, mean, and maximum measures.
While this GitHub issue can help you make the right decision, I prefer the 99th percentile, especially for setting requests and limits for non-trivial issues.
Where you can specify headroom for your requirement, I’d recommend anything between 20% to 60% for highly available production apps.
Alternatively, you can use rightsizing recommendations from the CAST AI report instead of calculating independently. It’s part of the Workload Efficiency report.
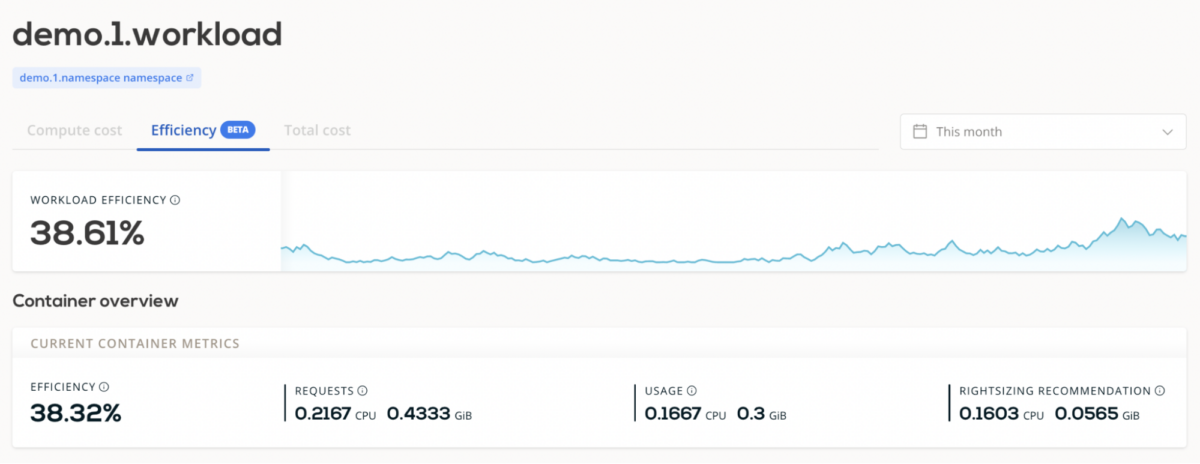
The report presents detailed costs for each workload, enabling you to see how many computing resources each consumes and identify improvement areas.
Based on your workload’s historical usage, CAST AI delivers tailored rightsizing recommendations, which you can use for requests and limits.
💡 Setting resource limits and requests manually isn’t your only option
CAST AI features Workload Autoscaler, which automatically scales your workload requests up or down to ensure optimal performance and cost-effectiveness. Learn more about this feature in the documentation.
Step #3: Set limits and requests
Let’s consider a scenario where you set limits equal to requests:

In reality, the usage curve can never be straight, but it constantly fluctuates, as in this graph:

While this situation may initially look good, the diagram above shows a new problem when the usage curve approaches the requests. One way to keep it below the request is by using Horizontal Pod Autoscaler (HPA).
Step 4: Set a Horizontal Pod Autoscaler (HPA)
HPA is a Kubernetes-native autoscaling mechanism that allows you to keep the usage curve below the request value.

You can divide the load among other replicas with an HPA to do so. This step will increase the overall load as more replicas get created, while flattening the usage curve for single Pods.
You can read more about HPA in this blog post, but for now, you need to know these two elements:
- targetCPUUtilizationPercentage sets the target CPU usage percentage for the autoscaler. Generally, a target CPU utilization percentage of about 70-80% of usage is recommended, but this may vary depending on factors like the Pod readiness time.
- minReplicas and maxReplicas set the minimum and maximum number of replicas for the autoscaler to maintain. You should set these values after considering factors such as expected traffic, the resource capacity of your cluster, and resource limits or requests already set.
Step 4: Deploy and monitor your application
Now that you have determined the values of HPA and resource limits/requests, deploy the application and monitor your cluster. I also recommend setting up CPU alerts.
Simplifying Kubernetes resource management
Setting the right Kubernetes resource limits and requests is essential to ensure cluster stability and avoid issues like overprovisioning, Pod eviction, CPU starvation, or running OOM. Together with HPA, limits and requests can significantly improve your resource usage.
Don’t risk cluster performance or pay for the CPUs and memory that your workloads don’t need. Get ahead of the rightsizing game with CAST AI’s free cost monitoring report that helps you determine the recommended resource settings. No more shooting in the dark!
Scan your cluster and gain a solid base for further improvements in Kubernetes resource management. This will only take a few minutes, and I hope you will find it helpful on your DevOps journey.
// get started
Optimize your cluster for free
Try powerful Kubernetes automation features combined with full cost visibility via cluster-specific savings reports and cost monitoring.
No card required
Unlimited clusters
Instant savings insights



Leave a reply