Things can quickly get complicated in multi-tenant, heterogeneous clusters. Kubernetes taints and tolerations are here to save the day.

If you ever needed to make sure that a pod got some special hardware or got colocated with/isolated from other pods, we get it. Kubernetes gives you so many options for complicated scheduling scenarios.
One smart way to add your containers to separate node groups is by using taints and tolerations.
Keep reading to learn what Kubernetes taints and tolerations are and how they work, plus a few best practices to help you make the most of them.
What are Kubernetes taints and tolerations?
To talk about taints and tolerations, we first need to clarify node affinity.
Node affinity attracts pods to a specific set of nodes. This can work as a hard requirement or preference.
A taint works in the opposite way – you can use it to let a node repel a given set of pods. You can apply one or more taints to a node. That way, you mark that the node shouldn’t accept any pods that happen not to tolerate these taints.
What about tolerations? They’re applied to pods and let the Kubernetes scheduler schedule pods with matching taints.
Note that a toleration allows scheduling but doesn’t guarantee it. That’s because the scheduler will also take other parameters into account as part of its operation.
Kubernetes taints and tolerations work together to make sure that pods don’t end up scheduled on nodes where you don’t want to see them.
Note: A node can have multiple taints associated with it. For example, most Kubernetes distributions automatically taint the master nodes so that only control plane pods can run on them.
Example of how taints and tolerations work
Imagine a cluster with three nodes: one master node and two worker nodes. Let’s call them node X and node Y.
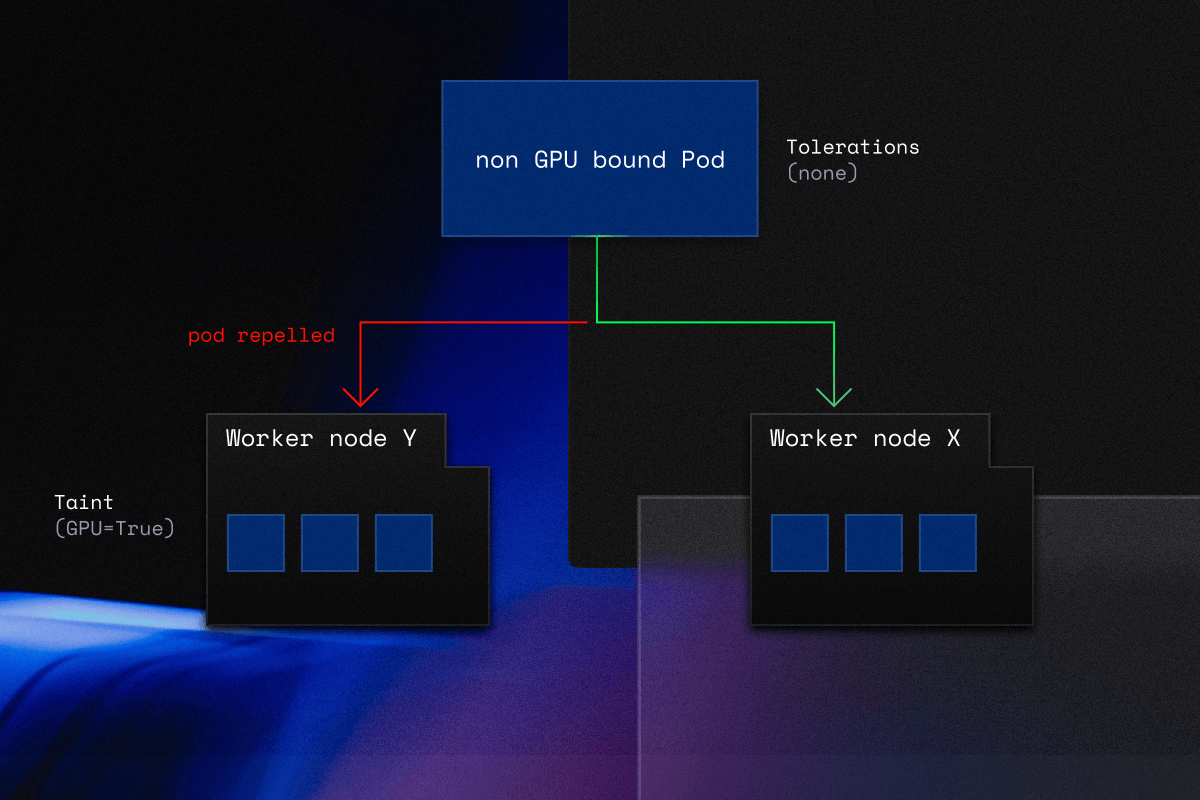
Your worker node X has a GPU instance attached to it. This makes running it pricy – but it’s the best match for machine learning workloads.
Worker node Y, on the other hand, is a general purpose node that comes with your regular CPU.
Here’s what you can achieve with taints and tolerations:
Add a taint to worker node X and give tolerations to specific workloads. This is how you make sure that the scheduler will only schedule workloads that need to be accelerated with a GPU in worker node X. You’ll never see a bunch of simple database queries eating away at your precious GPUs.
Pods that actually need GPUs will be scheduled on worker node X. All other pods will go straight to the general purpose worker node Y.

Default Kubernetes taints
Kubernetes comes with a number of default taints:
- node.kubernetes.io/not-ready – the node is not ready, corresponds to the NodeCondition Ready attribute status”False”.
- node.kubernetes.io/unreachable – the node is unreachable from the node controller, NodeCondition Ready status “Unknown”.
- node.kubernetes.io/memory-pressure – the node has memory pressure.
- node.kubernetes.io/disk-pressure – the node has disk pressure, which could slow your applications down (pod relocation is recommended).
- node.kubernetes.io/pid-pressure – the node has Process ID pressure, which might result in downtime.
- node.kubernetes.io/network-unavailable – the node’s network is unavailable. node.kubernetes.io/unschedulable – the node is unschedulable.
You can modify this by creating custom tolerations.
Kubernetes automatically adds tolerations for node.kubernetes.io/not-ready and node.kubernetes.io/unreachable with tolerationSeconds set to 300 seconds. You can change this behavior by specifying a different toleration for such node conditions.
How do taints and tolerations differ from pod anti-affinity or node affinity?
Kubernetes scheduling provides you with many more options than just taints and tolerations.
Two examples are pod anti-affinity and node affinity.
Pod anti-affinity prevents the scheduler from scheduling new pods on nodes if the node label selectors match those on existing pods. To achieve this goal, anti-affinity uses label key-value pairs on other pods.
If you look at the logical controllers in taints and tolerations such as NotIn or DoesNotExist, you may see some similarities.
But taints and tolerations give you far more granular control over pod scheduling than anti-affinity. You can automate tainting with specific node conditions and tolerations that will control the pod’s behavior if anything happens to the underlying node.
Node affinity lets you control where pods get scheduled. This approach also uses labels – they’re applied to nodes, and the scheduler locates pods on matching nodes.
Taints and tolerations work to repel pods from a node, and they can’t guarantee that a pod gets scheduled on a specific node. Without a taint that repels it, a pod can basically end up on any node you’re running.
You can blend node affinity with taints and tolerations to create special nodes that will only let specific pods run on them (just like in the example above).
Use cases of Kubernetes taints and tolerations
Dedicated nodes
Imagine that you want to offer specific users exclusive use of a set of nodes. You can apply a taint to those nodes and then apply a corresponding toleration to their pods. The easiest way to get this done is by writing a custom admission controller.
Pods with the right tolerations will be able to use the tainted nodes as well as any other nodes in the cluster. If you want to make sure that they only use the nodes dedicated to them, you need to add a label that is similar to the taint. And you need to add it to the same set of nodes.
Nodes with special hardware
Some clusters have a subset of nodes with specialized hardware, like GPUs. In this scenario, it’s better to make sure that pods that don’t need the specialized hardware don’t get scheduled on these nodes.
This way, you’ll leave room for pods that arrive later and actually need the specialized hardware.
How do you achieve this?
Taint the nodes with specialized hardware requirements using:
kubectl taint nodes nodename special=true:NoSchedule or
kubectl taint nodes nodename special=true:PreferNoScheduleNext, add a corresponding toleration to pods that are supposed to use this hardware. Just like in the previous scenario, the easiest way to apply these tolerations is via a custom admission controller.
Once your nodes are tainted, pods without the right toleration won’t be scheduled on them.
There are some ways to automate this – for example, by having pods request extended resources, causing the ExtendedResourceToleration admission controller to automatically add the correct toleration to that pod. As a result, the pod will be scheduled on the special hardware nodes. This helps to save time since you don’t have to manually add tolerations to your pods.
“Chatty” workloads
Suppose you have one of those chatty workloads in a single availability zone within a region. Cloud providers will charge you for network traffic that spans multiple availability zones. This might quickly get quite expensive, restraining this behavior with taints and tolerations is a smart and cost-efficient move.
Taint-based pod evictions
One of the results taints generate is NoExecute, which will evict the running pod from the node if the pod has no tolerance for the given taint.
Let’s explain this using the network outage scenario.
Imagine that your application encounters a network outage. This makes a node unreachable from the controller. A good way out of this is to move all the pods away from this node so they can get rescheduled to another node or multiple nodes. The Kubernetes node controller will carry this out automatically to save you the trouble.
The node controller will automatically taint nodes if specific conditions are true – in our case, a lack of network availability.
How to use Kubernetes taints and tolerations
Adding Kubernetes taints
To add a taint to a node, use the following kubectl taint command:
$ kubectl taint nodes <node name> <taint key>=<taint value>:<taint effect>You can specify any arbitrary string for the key and value. What about the taint effect? It defines how a tainted node should react to a pod that doesn’t have the right toleration. The effects you’re looking for are:
- NoSchedule – in this scenario, the Kubernetes scheduler will only schedule pods that have tolerations matching the tainted nodes.
- PreferNoSchedule – the scheduler will do its best to avoid scheduling pods lacking the tolerations for the tainted nodes.
- NoExecute – the scheduler will evict the running pods from the tainted node if they don’t have the right tolerations. This also works as a NoSchedule for pods that are being scheduled in addition to running pods being evicted.
To follow the previous example with GPU-powered nodes that you want to save only for special occasions, you can taint them like this:
kubectl taint nodes node-X gpu=true:NoScheduleThe result of this command should be:
node/node-X taintedRemoving Kubernetes taints
You can remove the taint by specifying the taint key and effect with “-” to mean the removal:
kubectl taint nodes node-X gpu:NoSchedule-The result should be:
node/minikube-m02 untaintedAdding tolerations
How do you add toleration to your pods to make sure they’re not repelled from a tainted node?
You need to specify the tolerations in PodSpec using the format depending on the operator: Equal or Exists.
Equal operator
tolerations:
- key: "<taint key>"
  operator: "Equal"
  value: "<taint value>"
  effect: "<taint effect>"
Exists operator
tolerations:
- key: "<taint key>"
operator: "Exists"
effect: "<taint effect>"The Equal operator requires the taint value, and it won’t match if that value is different. The Exists operator will match any value since it only checks if the taint is defined (regardless of the value).
You can use the Equal operator for the gpu=true:NoSchedule taint you defined earlier:
apiVersion: v1
kind: Pod
metadata:
  name: nginx-test
  labels:
    env: dev-env
spec:
  containers:
  - name: nginx
    image: nginx:latest
    imagePullPolicy: IfNotPresent
    resources:
      requests:
        memory: "256Mi"
        cpu: "200m"
      limits:
        memory: "512Mi"
        cpu: "400m"
  tolerations:
  - key: "gpu"
    operator: "Equal"
    value: "true"
    effect: "NoSchedule"
This way, only pods that have the matching toleration will be allowed to get scheduled on the tainted node.
By using the Exists operator, you can match any taint in a node by defining the Exists operator without any key, value, or effect:
tolerations:
  operator: "Exists"
Using multiple taints and tolerations
Kubernetes supports a variety of taints and tolerations on nodes and pods. This lets it act as a filter for these taints and tolerations – it examines all accessible taints, disregards ones with matching toleration, and applies the effect of the non-matching taint.
Imagine you have these three taints:
kubectl taint nodes node-X gpu=true:NoSchedule
kubectl taint nodes node-X project=system:NoExecute
kubectl taint nodes node-X type=process:NoSchedule
You then create a pod, but put only two taints to match:
apiVersion: v1
kind: Pod
metadata:
  name: nginx-test
  labels:
    env: test-env
spec:
  containers:
  - name: nginx
    image: nginx:latest
    imagePullPolicy: IfNotPresent
    resources:
      requests:
        memory: "256Mi"
        cpu: "200m"
      limits:
        memory: "512Mi"
        cpu: "400m"
  tolerations:
  - key: "gpu"
    operator: "Equal"
    value: "true"
    effect: "NoSchedule"
  - key: "project"
    operator: "Equal"
    value: "system"
    effect: "NoSchedule"
In this scenario, there’s no match for the third taint. The first two taints have matching tolerations. So, the pod will get repelled from the node, and the pods inside it will continue to run with no interruptions.
6 best practices for using taints and tolerations
1. Pay attention to your taint keys and values
It pays to keep things simple and develop a system that makes sense for your team and the broader IT organization. Many developers strive to keep these as short as possible, which helps in their maintenance over the long term.
2. Perform this one check before you use NoExecute
Be sure to check for matching taints and tolerations before using NoExecute. Make sure that the required pods within the node have matching taints and tolerations before giving NoExecute the green light.
3. Use node affinity to schedule pods on specific nodes
In general, it’s best to use node affinity to make sure that pods get scheduled on specific nodes. You can get away with using taints and tolerations if you’re running a relatively small cluster where repelled pods will get scheduled in any other available node. Combining node affinity with taints and tolerations is the best solution.
Not sure where to start? Here’s a guide to help you out: Node Affinity, Node Selector, and Other Ways to Better Control Kubernetes Scheduling
4. Monitor the costs your cluster generates
If you overdo it taints and tolerations, you risk interfering with the scheduler. This may impact the cluster’s efficiency and generate higher costs. Use a cost monitoring solution that gives you cost insights at every level of granularity you need for Kubernetes.
Here’s a good starting point: Kubernetes Cost Monitoring: 3 Metrics You Need to Track ASAP
5. Includewildcardable tolerations in important DaemonSets
All nodes should execute essential DaemonSets that provide basic IO for pods such as CNI and CSI. Similarly, observability components such as the logging forwarder and APM are often required on all nodes.
If you need to build an isolated node group – for example, VMs with unique hardware like GPUs or short-lived special requirements workloads like Spark tasks – these nodes will almost always get tainted. Only workloads that should be planned on these nodes will be scheduled there. You don’t want haphazard pods to deplete important resources.
When this occurs, some critical DaemonSets may be unable to start on these nodes owing to taints (lack of toleration), resulting in a gap in logging coverage.
Including these two lines in all important DaemonSets will assure complete coverage:
tolerations:
 operator: "Exists"
6. Use taints and tolerations for spot instances
Spot instances offer excess capacity at a large discount. They’re a massive cost saving factor but come with the risk of interruption – the provider might take them away from you at any moment. If your workload is qualified to run on a spot instance, you can add taints and tolerations to make sure that these workloads tolerate the tainted spot instances.
This solves only one part of the problem since you’re still facing the risk of interruption. Automation can solve both parts for you.
Take a look at this case study to see how a pharm company automated the entire spot instance lifecycle and ended up saving 76% on running their ML experiments.
Wrap up
Kubernetes taints and tolerations are critical components of Kubernetes scheduling. They let you reject certain pods from tainted nodes and can function as filters in multi-taint deployments. They can also adjust the pod eviction behavior based on node circumstances.
To establish dedicated nodes and fine-tune pod scheduling, use Kubernetes taints and tolerations with additional scheduling capabilities like node affinity.
You can automate some of these tasks with a Kubernetes automation platform like CAST AI. Book a demo to get a personal walkthrough with an engineer.
Automate your Kubernetes experience & stop micromanaging your infra
Book a call and see how CAST AI helps in Kubernetes management


Leave a reply