
The managed Kubernetes solutions from major cloud providers like AWS, Google Cloud Platform, and Azure usually have capabilities to autoscale GPU node pools. But Kubernetes GPU autoscaling quickly gets tricky.
Unfortunately, you have to configure GPU node pools manually. And the nodes may linger for a while, increasing your cluster costs.
The CAST AI autoscaling and bin packing engine provisions GPU instances on demand and downscales them when needed, while also taking advantage of spot instances and their price benefits to drive costs down further.
Note: At the moment, CAST AI supports GPU workloads on Amazon Elastic Kubernetes Service (EKS) and Google Kubernetes Engine (GKE). Support for Azure Kubernetes Service (AKS) is on the way.
Using the default template to autoscale workloads
Onboarding
1. To start benefiting from the CAST AI autoscaler, we first need to have a cluster onboarded. We can do that via the console UI by getting the onboarding script by clicking on the Connect Cluster button.

After selecting your provider, you should get a script like this and execute it for the target cluster.
curl -H "Authorization: Token <token>" "https://api.cast.ai/v1/agent.yaml?provider=gke" | kubectl apply -f -This is a read-only onboarding that enables our backend to understand what workloads/nodes exist in your cluster.
2. After onboarding the read-only agent, you can view the nodes, workloads, etc., in that cluster.
To use autoscaler, we’ll have to enable automated optimization mode, which gets permissions from the cloud provider to provision/remove instances. Click the “Enable CAST AI” button in the console.
You should get a script that looks like this:
CASTAI_API_TOKEN=<token> CASTAI_CLUSTER_ID=55db5cfd-0878-4eda-8492-70b6918c16d1 CLUSTER_NAME=valdas-08-18 INSTALL_KVISOR=true LOCATION=us-central1 PROJECT_ID=<project-id> /bin/bash -c "$(curl -fsSL 'https://api.cast.ai/v1/scripts/gke/onboarding.sh')"After executing the script, we can now use the CAST AI autoscaling engine.
Autoscaling GPU Workloads
Prep
To use GPU nodes, we first need to install the GPU drivers, which come in the form of daemonsets.
When onboarding the cluster, CAST AI installs the drivers for EKS, so if you’re using EKS, you don’t need to do anything more, but this guide focuses on GKE.
For GKE, users need to install the drivers manually for now, but this will be automated by CAST AI in the very near future – perhaps at the time of reading, it’s already fully supported. The TL;DR version of how to install the drivers:
kubectl apply -f https://raw.githubusercontent.com/GoogleCloudPlatform/container-engine-accelerators/master/nvidia-driver-installer/cos/daemonset-preloaded.yamlBut if you want to go through it, you can find the official Google guide here.
Next steps
We are now fully prepared to use the CAST AI autoscaler to add GPU-ready nodes. To test this, let’s create some workloads that require GPUs.
1. Let’s first create a workload that has GPU requests.
apiVersion: apps/v1
kind: Deployment
metadata:
 name: cast-ai-gpu-test
 labels:
   app: cast-ai-gpu-test
spec:
 replicas: 1
 selector:
   matchLabels:
     app: cast-ai-gpu-test
 template:
   metadata:
     labels:
       app: cast-ai-gpu-test
   spec:
     tolerations:
     - key: "nvidia.com/gpu"
       operator: Exists
     containers:
     - name: my-gpu-container
       image: nvidia/cuda:11.0.3-runtime-ubuntu20.04
       command: ["/bin/bash", "-c", "--"]
       args: ["while true; do sleep 600; done;"]
       resources:
           requests:
               nvidia.com/gpu: 1
           limits:
               nvidia.com/gpu: 1
Note that we added a toleration for a specific taint, as the nodes added by the CAST AI autoscaler will have a taint. The taint is there to prevent other pods from being scheduled on that node, using up the CPUs without needing the GPUs.
- key: "nvidia.com/gpu"
  operator: Exists
2. After applying the manifest, we should see that the pod is pending:
❯ kubectl get deploy
NAME               READY   UP-TO-DATE   AVAILABLE   AGE
cast-ai-gpu-test   0/1     1            0           48s
This is because we haven’t yet enabled the CAST AI autoscaler. To do that in the console, go to
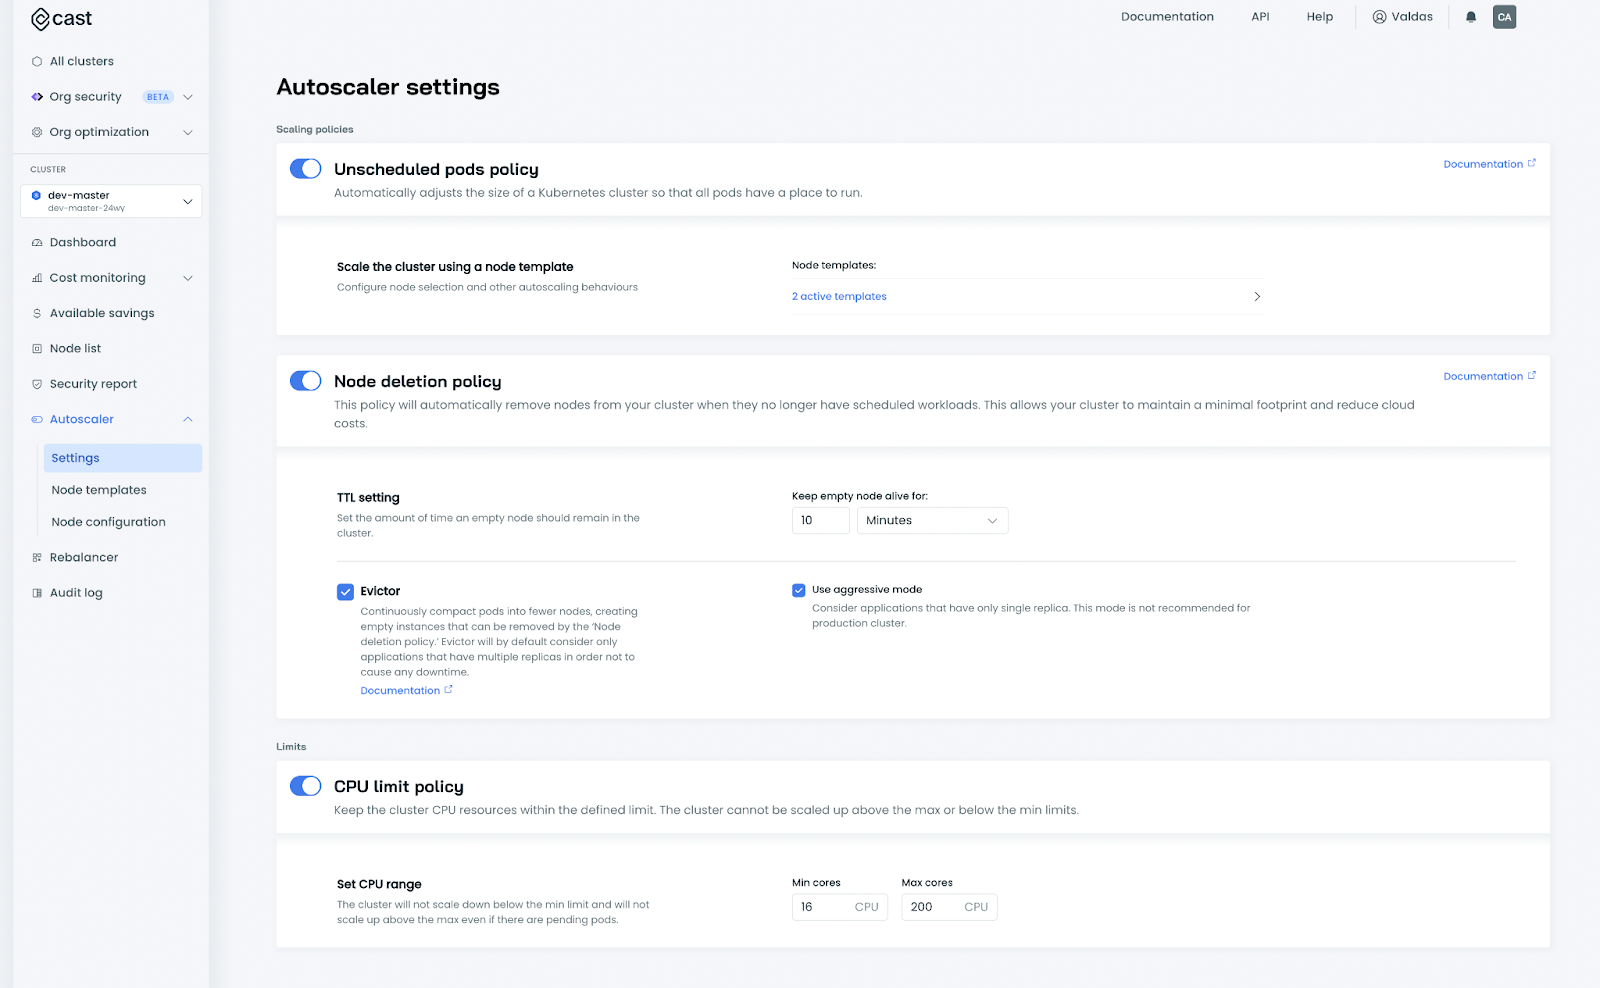
Autoscaler -> Settings -> and turn the Unscheduled pods policy on, and press save at the bottom of the page. After that is done, we need to wait a bit.
3. Within a minute (this may actually depend on the GPU availability in the cloud at the time), we should see that the pod is now ready:
❯ kubectl get deploy
NAME               READY   UP-TO-DATE   AVAILABLE   AGE
cast-ai-gpu-test   1/1     1            1           18m


❯ kubectl get po
NAME                                READY   STATUS    RESTARTS   AGE
cast-ai-gpu-test-566ffdbb54-fnvfg   1/1     Running   0          20m
In addition, if we get the node that the pod is scheduled on and describe the node, we should see that the node has a GPU resource registered on it.
❯ kubectl get pod cast-ai-gpu-test-566ffdbb54-fnvfg -o=jsonpath='{.spec.nodeName}'
gke-valdas-08-18-cast-pool-f2b0a429

❯ kubectl describe no gke-valdas-08-18-cast-pool-f2b0a429
...
Allocatable:
 cpu:                940m
 ephemeral-storage:  56723747894
 hugepages-1Gi:      0
 hugepages-2Mi:      0
 memory:             2679708Ki
 nvidia.com/gpu:     1
 pods:               110
...
This is exactly where CAST AI chimes in.
If we have multiple pods requiring x number of GPUs, the CAST AI autoscaler will find the cheapest instance combination to fit all of the pods, resulting in decent GPU workload costs.
As an example, let’s scale up the same deployment to three replicas:
❯ kubectl scale deploy cast-ai-gpu-test --replicas=3
deployment.apps/cast-ai-gpu-test scaled
After a few seconds, we’ll see that the pods got scheduled, except this time an instance with 2 GPUs added since it was cheaper than adding two instances with 1 GPU each.
❯ k get po
NAME                                READY   STATUS    RESTARTS   AGE
cast-ai-gpu-test-566ffdbb54-fnvfg   1/1     Running   0          35m
cast-ai-gpu-test-566ffdbb54-krtzg   1/1     Running   0          6m44s
cast-ai-gpu-test-566ffdbb54-znfj6   1/1     Running   0          6m44s
The resources of the added node look like this:
Allocatable:
 cpu:                940m
 ephemeral-storage:  56723747894
 hugepages-1Gi:      0
 hugepages-2Mi:      0
 memory:             2679708Ki
 nvidia.com/gpu:     2
 pods:               110
Note that there’s one more interesting thing happening here. The added instance was an N1 instance, which can feature attachable GPUs. So, the CAST AI autoscaler found the cheapest GPU for the N1 instance and created a node with an attached GPU.
You can find the GPU and instance info on the node labels. In this case, it’s here:
Labels:
   node.kubernetes.io/instance-type=n1-standard-1
   nvidia.com/gpu=true
   nvidia.com/gpu.count=2
   nvidia.com/gpu.memory=30516
   nvidia.com/gpu.name=nvidia-tesla-t4
4. Verification.
The previous examples show a container that is able to connect to the CUDA context but doesn’t actually do any work. Instead of using that image, let’s use an image that tries to do some work and verify that the pod is able to use the GPU resource.
To do that, let’s modify the original yaml to use a GPU test image:
apiVersion: apps/v1
kind: Deployment
metadata:
 name: cast-ai-gpu-test
 labels:
   app: cast-ai-gpu-test
spec:
 replicas: 1
 selector:
   matchLabels:
     app: cast-ai-gpu-test
 template:
   metadata:
     labels:
       app: cast-ai-gpu-test
   spec:
     tolerations:
     - key: "nvidia.com/gpu"
       operator: Exists
     containers:
     - name: my-gpu-container
       image: "k8s.gcr.io/cuda-vector-add:v0.1"
       resources:
           requests:
               nvidia.com/gpu: 1
           limits:
               nvidia.com/gpu: 1
After a few seconds, we should see that the pod is in a completed state:
❯ kubectl get po
NAME                                READY   STATUS             RESTARTS       AGE
cast-ai-gpu-test-84cbbf4b75-5h8xc   0/1     Completed          0              20s
To verify that it worked, you can check the logs of the pod itself:
❯ kubectl logs cast-ai-gpu-test-84cbbf4b75-5h8xc
[Vector addition of 50000 elements]
Copy input data from the host memory to the CUDA device
CUDA kernel launch with 196 blocks of 256 threads
Copy output data from the CUDA device to the host memory
Test PASSED
Done
GPU customization
The examples I showed here demonstrate how to leverage any GPU that was the cheapest at the time of creating an instance. But in some cases, you may want to use specific GPUs for your workloads.
There are multiple ways of going about this:
1. Specify an additional node selector or node affinity for the specific GPU device on your pod. We can modify the previous deployment manifest to have this:
apiVersion: apps/v1
kind: Deployment
metadata:
 name: cast-ai-gpu-test
 labels:
   app: cast-ai-gpu-test
spec:
 replicas: 1
 selector:
   matchLabels:
     app: cast-ai-gpu-test
 template:
   metadata:
     labels:
       app: cast-ai-gpu-test
   spec:
     nodeSelector:
       nvidia.com/gpu.name: "nvidia-tesla-t4"
     tolerations:
     - key: "nvidia.com/gpu"
       operator: Exists
     containers:
     - name: my-gpu-container
       image: "k8s.gcr.io/cuda-vector-add:v0.1"
       resources:
           requests:
               nvidia.com/gpu: 1
           limits:
               nvidia.com/gpu: 1
This way, only that specific GPU will be used.
If multiple GPU types are suitable for a given workload, we can use the multi-value affinity to choose the cheapest one at the time.
...
   spec:
     affinity:
       nodeAffinity:
         requiredDuringSchedulingIgnoredDuringExecution:
           nodeSelectorTerms:
           - matchExpressions:
             - key: nvidia.com/gpu.name
               operator: In
               values:
               - nvidia-tesla-a100
               - nvidia-tesla-t4
               - nvidia-tesla-p100
               - nvidia-tesla-p4
...
2. Custom node templates are another important point.
Think of node templates as a CAST AI virtual node pool. The actual node pool is always the same, but it can provide logical separation for your workloads.
In the previous examples, we used the default template.
Let’s create a custom one to add constraints there instead of our pod specification. To create a template, go to Autoscaler -> Node Templates -> Add New Template in the UI.
We can give the template a name, for example, `gpu-template`. Then we can select the `GPU-enabled instances only` checkbox.
In the instance constraints, we can now choose a number of constraints, such as `Include GPU Name: T4`. We can then see which instances would be available with these constraints at the bottom.
In this case, the requirements are for all instances added by using that template, which can be done by just specifying the template selector/toleration:
nodeSelector:
 scheduling.cast.ai/node-template: "gpu-template"
tolerations:
 - key: "scheduling.cast.ai/node-template"
   value: "gpu-template"
   operator: "Equal"
   effect: "NoSchedule"
To sum up, you can leverage GPU instances using CAST AI in two ways:
1. By defining the requests at the workload level.
2. By defining the constraints on the template and then selecting that template with a workload.
Check out this guide for another detailed take: Kubernetes Scheduler for GPU-Heavy Apps: How to Streamline Scheduling with Node Templates
Downscaling
Once our workloads are done using the required resources, we want the resources to be decommissioned. In this case, it’s the GPU nodes.
This is where our node deletion policy comes into play. If you go to Autoscaler -> Settings -> Node deletion policy. Enable it to delete any nodes that have been empty for longer than the time to live (TTL).
This way, after your workloads are done using the GPU nodes, they will be deleted as quickly as possible, keeping your costs in check.
Final notes
The CAST AI autoscaler simplifies the process of managing GPU workloads while focusing on keeping costs low. Smart bin packing can quickly understand your specific workload needs and pick the right instances for your workloads.
Book a demo to get a personalized walkthrough of the platform with one of our engineers.


