Overprovisioning is the top reason why teams see their cloud bills constantly growing. But choosing the best instances from the hundreds of options AWS offers is a tough call. Luckily, automation is here to help and slash your EKS costs in 15 minutes. Read this case study to learn more.
How are you supposed to know which ones will deliver the performance you need? Luckily, there are automation solutions that can do that for you. The mobile marketing leader Branch saved several millions of dollars per year by leveraging spot instance automation and rightsizing.
If you know your way around Amazon Kubernetes Elastic Service (EKS) pricing, jump directly to the practical step-by-step guide to EKS cost optimization.
EKS cluster pricing explained
You will pay $0.10 per hour for each EKS cluster you generate. Remember: a single EKS cluster can run multiple applications, allowing you to maximize your ROI.
You can run EKS on AWS using one of two options:
- EC2 machines
- AWS Fargate
Keep reading to see how costs are calculated for each EKS hosting method.
EC2
EC2 pricing is straightforward – it works the same as it does when using other cloud services. The EKS cluster is deployed, and you pay the standard rate of $0.10 per hour of use. Also, your worker nodes run on the provided capacity (Outposts EC2) at no additional cost.
Here, you can choose from four pricing models:
On-demand instances
On-demand instances allow you to pay for compute capacity per hour or per second of use with no upfront payments. Typically, on-demand instances work best for test applications and short-term use. But if you’re looking for long-term instances, then there are better options available such as spot instances.
Spot instances
Spot instances offer some of the best EKS cost discounts. You’re paying for unused EC2 instances, but these can be interrupted with short notice.
So, spot instances are best for applications that can be interrupted, such as data analysis, background processing, and other batch jobs.
On the other hand, spot instances would not be a well-suited option for client-facing systems due to the potential interruption at any moment (AWS gives 2 minutes of notice).
Reserved instances
Next up, we have reserved instances – a more reliable option than spot instances, but still offering a generous discount compared to on-demand instances.
Reserved instances allow you to reserve a period of one to three years of compute power and resources, which seems like a good fit for consistent workloads and optimizing EKS costs. But it also presents a risk. You likely don’t know where your company will be headed three years from now, so planning to use a certain level of cloud capacity is a little like fortune telling from a Magic 8 ball.
Dedicated host
Finally, there’s a dedicated host – a server dedicated to your use which can help you reduce costs by using server-bound licenses from Windows server, SQL, and others. When using a dedicated host, you’ll be paying on-demand pricing for every hour used.
AWS Fargate
AWS Fargate is typically the preferred hosting option, especially for smaller projects.
Fargate prices are calculated based on vCPU memory resources – used from download until termination. But note that a minimum of one minute is used per use; even if you use less time, this is rounded up. Other factors that affect AWS Fargate prices include operating system choice, region, and savings plans.
For example, if you intend to use EKS on AWS Fargate for at least one year, then you can benefit from compute savings plans. These plans offer up to 50% savings on AWS Fargate use when you choose a commitment of either one or three years.
While savings plans give you more flexibility than reserved instances, they still force you to set a threshold of capacity you’re expecting to use. If you fail to do that, you’ll end up paying for resources that get wasted.
If you’re just experimenting with Fargate and aren’t ready to commit to a longer-term plan, the more basic option is recommended.
6 EKS cost optimization tips
1. Follow the AWS cost optimization pillars
A cost-effective workload achieves business objectives and ROI while remaining under budget. EKS cost optimization pillars define essential design considerations, assisting you in assessing and improving AWS-deployed applications.
As per AWS, the four pillars cover the following areas:
- Define and enforce cost allocation tagging.
- Define metrics, set targets, and review at a reasonable cadence.
- Enable teams to architect for cost via training, visualization of progress goals, and a balance of incentives.
- Assign optimization responsibility to an individual or to a team.
2. Rightsize your virtual machines
Selecting the correct VMs will dramatically reduce your EKS costs because you’ll only acquire enough capacity for the performance you require.
However, the process might be difficult since you need to identify basic requirements before selecting the appropriate instance type and size. This makes it very time-consuming and tedious, especially given that your application’s demands are likely to change over time.
Good news: you can automate VM rightsizing! Platforms such as CAST AI can select the optimum instance types and sizes for your application’s needs while lowering your EKS expenditures. It will fish in a much larger pond than a human engineer has time to explore, bringing you opportunities as AWS expands its offer (AWS Graviton offering is a good example here).
3. Make good use of autoscaling
One of the most successful EKS cost optimization approaches is autoscaling. The tighter your Kubernetes scaling mechanisms are set, the less waste and cost of operating the workload there will be.
Kubernetes includes numerous autoscaling algorithms that help to provide adequate capacity without overprovisioning. However, they can be time-consuming to set up and configure. That’s why many teams use modern autoscalers, which eliminate a major portion of manual labor and reduce cloud waste, leading to significant savings.
4. Set resource requests and limits
Defining pod requests and limits is another excellent technique to lower the cost of your EKS cluster.
Did you know that one in every two K8s containers uses less than a third of its requested CPU and memory? This is where limits and requests can make a massive difference.
Overprovisioning CPU and RAM will keep the lights on but will ultimately result in overspending. Underprovisioning these resources puts you at danger of CPU throttling and out-of-memory kills.
You may increase your EKS cluster savings by continuously lowering to the bare minimum of nodes by bin-packing pods with an automated solution. CAST AI deletes the node from the cluster when it gets empty – and here’s how it works.
5. Practice scheduling and decommissioning resources
Not all clusters must be active at all times. For example, you might quickly disable a Dev/Test environment while not in use.
EKS allows you to stop a cluster to prevent unwanted charges from accumulating. You can save compute expenses by shutting down its node pools while retaining objects and cluster data for when you restart it.
And if you don’t want to do it manually anymore (why would you? ), check out CAST AI’s cluster scheduler. It will switch your cluster on and off automatically as needed.
6. Automate spot instances
Spot instances allow you to use underutilized AWS capacity at a substantially cheaper cost than on-demand pricing. This method works great for workloads that can withstand interruptions.
To make the most of spot instances and have peace of mind, you need a solution that automatically provisions and manages them. Ideally, it should also move workloads to on-demand instances if no appropriate spot instances are available.
EKS cost optimization: a practical example
If you’re curious about how they work, follow my journey and see how I reduced the costs of running Kubernetes containers on Amazon EKS by 66% using CAST AI, in 15 minutes.
TL;DR
I started by provisioning an e-commerce app (here) on an EKS cluster with six m5 nodes (2 vCPU, 8 GiB) on AWS EKS. I then deployed CAST AI to analyze my application and suggest optimizations. Finally, I activated automated optimization and watched the system continuously self-optimize.
The initial cluster cost was $414 per month. Within 15 minutes, in a fully automated way, the cluster cost went to $207 (a 50% reduction) by reducing six nodes to three nodes. Then, 5 minutes later, the cluster cost went down to $138 per month using spot instances (a 66% reduction).
Step 1: Deploying my app and finding potential savings
I deployed my app in 6 nodes on EKS. Here’s what it looked like before – all the nodes were empty:
The cluster was created via eksctl:
eksctl create cluster –name boutique-blog-lg -N 6 –instance-types m5.large –managed –region us-east-2
And here’s what it looked like after deployment (I’m using kube-ops-view, a useful open-source project to visualize the pods). The green rectangles are the pods:
With Kubernetes, the application’s pods (containers) are spread evenly across all the nodes by default. Kubernetes is a fair orchestration engine; that’s just how it works. The CPUs range between 40% and 50%.
Note: All the EKS autoscaling mechanisms have been disabled on purpose since CAST AI will substitute them.
Now it’s time to connect my EKS cluster to CAST AI. I created a free account on CAST AI and selected the Connect your cluster option.
The CAST AI agent went over my EKS cluster (learn more about how it works) and generated a Cluster Savings Report:
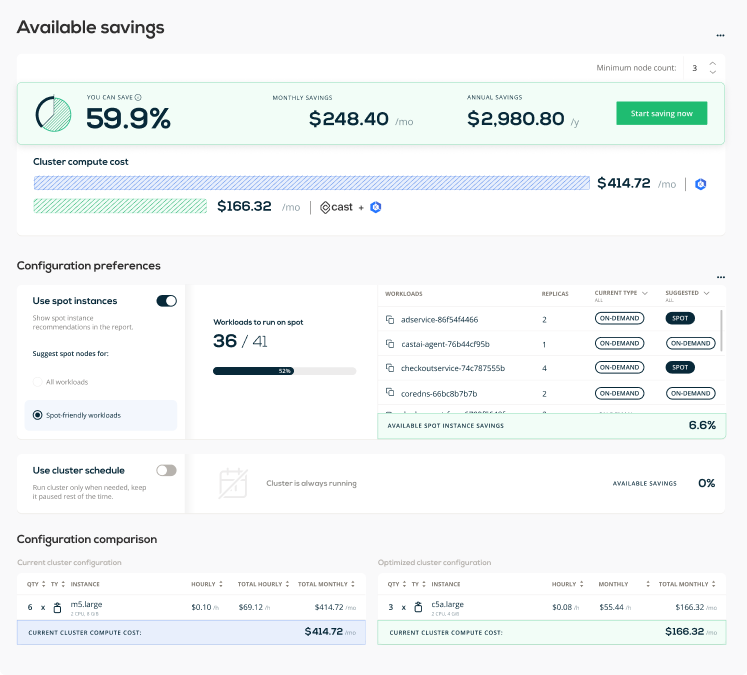
I can see different levels of savings I can achieve depending on the level of spot instance usage. A spot-only cluster generally brings maximum savings, spot-friendly clusters are balanced, and no spot usage brings the least savings.
Now, I can see here that if I switched my 6 m5.large instances to what CAST AI recommends – 3 c5a.large – I could reduce my bill by almost 60%. Sounds like a plan!
With spot instances, I could get even higher savings (66.5%).
See CAST AI in action
End those massive cloud bills! Learn how to cut 50%+ automatically
Step 2: Activating the cost optimization
To get started with cost optimization, I need to run the onboarding script. This script onboards the cluster into managed state, so it can be optimized automagically. To do this, CAST AI needs additional credentials as outlined here.
Step 3: Enabling policies
First, I have to make a decision: allow CAST AI to manage the whole cluster or just some workloads. I go for standard Autoscaler since I don’t have any workloads that should be ignored by CAST AI.
Next, I turn on all the relevant policies.
I can also configure the Autoscaler settings.
Here’s a short overview of what you can find on this page:
Unscheduled pods policy
This policy automatically adjusts the size of a Kubernetes cluster, so that all the pods have a place to run. This is also where I turn the spot instance policy on and use spot fallback to make sure my workloads have a place to run when spot instances get interrupted.
Node deletion policy
This policy automatically removes nodes from my cluster when they no longer have workloads scheduled to them. This allows for my cluster to maintain a minimal footprint and greatly reduces its cost. As you can see, I can enable Evictor, which continuously compacts pods into fewer nodes – creating a lot of cost savings!
CPU limit policy
This policy keeps the defined CPu resources within the defined limit. The custer can’t be beyond the maximum and minimum thresholds.
| I enabled Evictor and set it to work. |
This is what Evictor in action looks like:
- One node (in red below) is identified as a candidate for eviction.
- Evictor automatically moves the pods to other nodes “bin-packing.”
- Once the node becomes empty, it’s deleted from the cluster.
- Go back to step 1.
One node is deleted:
Here are the Evictor logs:
time="2021-06-14T16:08:27Z" level=debug msg="will try to evict node \"ip-192-168-66-41.us-east-2.compute.internal\""
time="2021-06-14T16:08:27Z" level=debug msg="annotating (marking) node \"ip-192-168-66-41.us-east-2.compute.internal\" with \"evictor.cast.ai/evicting\"" node_name=ip-192-168-66-41.us-east-2.compute.internal
time="2021-06-14T16:08:27Z" level=debug msg="tainting node \"ip-192-168-66-41.us-east-2.compute.internal\" for eviction" node_name=ip-192-168-66-41.us-east-2.compute.internal
time="2021-06-14T16:08:27Z" level=debug msg="started evicting pods from a node" node_name=ip-192-168-66-41.us-east-2.compute.internal
time="2021-06-14T16:08:27Z" level=info msg="evicting 9 pods from node \"ip-192-168-66-41.us-east-2.compute.internal\"" node_name=ip-192-168-66-41.us-east-2.compute.internal
I0614 16:08:28.831083 1 request.go:655] Throttling request took 1.120968056s, request: GET:https://10.100.0.1:443/api/v1/namespaces/default/pods/shippingservice-7cd7c964-dl54q
time="2021-06-14T16:08:44Z" level=debug msg="finished node eviction" node_name=ip-192-168-66-41.us-east-2.compute.interna
And now the second and third nodes were evicted – 3 nodes remain:
After about 10 minutes, Evictor deleted 3 nodes and left 3 nodes running. Note that CPUs are now at a much healthier 80% rate.
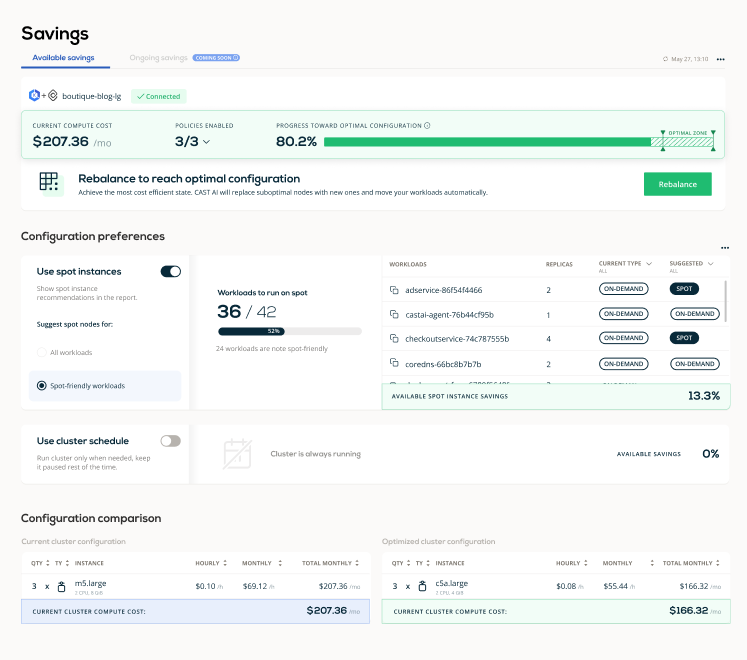
The cost of this cluster is now $207.36 per month – half of the initial cost of $414 per month.
I managed to achieve 80% of the projected savings. This is what I saw in my CAST AI dashboard:
Step 4: Running the full rebalancing for continuous optimization
Steps 1, 2, and 3 are fully automated. CAST AI gradually shrinks the cluster by eliminating waste and overprovisioning. It does so by bin-packing pods and emptying nodes one by one. From that moment, the cluster is optimized, and Evictor will continuously look for further optimization opportunities over time.
The next step is to run the full rebalancing where CAST AI assesses all the nodes in my cluster and then replaces some (or all) with the most cost-efficient nodes available, which meet my workload requirements.
The nodes are cordoned:
The first two nodes are drained, and the AI engine selects the most appropriate instances type for these nodes. This is what I saw in my CAST AI dashboard:
As you can see, my cluster now has only two nodes and costs $138 per month. It’s hard to imagine that I started out with a monthly EKS bill of $414.72!
Automated EKS cost optimization just works
Moving from a non-optimized setup to a fully-optimized one was a breeze. CAST AI analyzed my setup, found opportunities for savings, and swiftly optimized my cluster in 15 minutes. I cut my EKS bill by half in 15 minutes, from $414 to $207.
Then, I activated advanced savings by asking CAST AI to replace nodes with more optimized nodes and achieved further savings, ending up with a $138 bill.
Then I rebalance or partially rebalance the cluster and achieve further savings and the most optimized cluster state.
Run the free CAST AI Savings Report to check how much you could potentially save. It’s the best starting point for any journey into cloud cost optimization.

FAQ
There are several strategies to reducing and managing EKS costs, including rightsizing your nodes for optimal usage, using spot instances for non-critical workloads, taking advantage of savings plans or reserved instances, and optimizing your storage and networking usage.
Amazon EKS comes with a handful of advantages:
– You don’t need to set up, run, or manage your Kubernetes control plane.
– You can quickly deploy Kubernetes open-source community tools and plugins.
– EKS automates load distribution and parallel processing better than any DevOps engineer,
– If you use EKS, your Kubernetes assets will work flawlessly with AWS services.
– EKS uses VPC networking.
– Any EKS-based application is compatible with those in your existing Kubernetes environment. You don’t have to alter your code to move to EKS.
– It supports EC2 spot instances with managed node groups that use Spot Instances that result in significant cost reductions.
You’ll be charged $0.1 per hour for every Kubernetes cluster by EKS. This means some $74 each month per cluster, which isn’t a lot – especially if you’re handling the scalability level of Kubernetes well. The $74 extra on top of your bill isn’t going to make much difference compared to your overall compute costs.
Naturally, the cost of your EKS setup depends on what you choose to run it on. You can run EKS on AWS using EC2 or AWS Fargate. There’s also an on-premises using AWS Outposts.
If you decide to use EC2 (with EKS managed node groups), expect to pay for all the AWS resources you create to run your Kubernetes worker nodes. Just like with other AWS services, you only pay for what you use.
First of all, Amazon EKS comes at a fee of $0.10 per hour for each cluster that you create. This sums up to around $74 per month per cluster. A single Amazon EKS cluster can be used to run multiple applications thanks to Kubernetes namespaces and IAM security policies.
Next, there are the compute costs. You can run EKS on AWS using EC2 or AWS Fargate.
If you go for EC2, you’ll be paying for all the AWS resources created to run your worker nodes (for example, EC2 instances or EBS volumes). There are no minimum fees or upfront commitments – you only pay for what you use.
And if you pick AWS Fargate, the pricing will be calculated based on the vCPU and memory resources used from the moment you start downloading your container image until the Amazon EKS pod terminates (the amount is rounded up to the nearest second). The minimum charge of 1 minute applies here.
AWS Savings Plans provide significant savings on your AWS compute usage. Essentially, you commit to a certain amount of compute usage (measured in $/hour) for a 1 or 3-year term, and in return, you receive a hefty discount compared to on-demand instance pricing.
Spot instances allow you to take advantage of unused EC2 capacity in the AWS cloud. Spot instances are available at up to a 90% discount compared to on-demand prices, making them an effective way to save money on EKS workloads that can handle interruptions.
EKS storage costs can be optimized by using Amazon EBS volumes wisely – delete unneeded volumes, and ensure snapshots are managed efficiently. Also, it’s important to choose the right type of storage for your needs (EBS, instance storage, EFS, or S3) and to monitor and optimize your usage.
Yes, optimizing your containers can definitely help to reduce costs. This can include techniques like running multiple containers per pod if they share resources, using lighter base images, ensuring your images are efficiently built, and removing unused containers and images.



Leave a reply
interesting case study, efficient autoscaling
Evictor looks promising
so Evictor basically removes excessive nodes?
Yes, that is correct.
nice to see a real-life example
Hi, you may also like to check out our case studies with real clients. You can find this here: https://cast.ai/case-studies/
This kubeops view is major discovery for me, visualizing the clusters and pods, loved that!
Even though the first stage looks like just simply shrinking the pods in to fever clusters, the autoscaling and spot instance replacement looks promising, I’ll give it a shot with my team later on this week
I liked how the evictor is such a simple feature, but so needed that we sometimes dont think about how much it could save..
Running this script in my cluster doesn’t seem a very great idea, can I have a look at it before running it?