
Overprovisioning is the top reason why teams see their cloud bills constantly growing. However, optimizing cloud resources is plain hard. Here are 8 proven tactics to help you reduce EKS costs without taking a performance hit.
1. Follow the AWS EKS cost optimization pillars
Amazon Elastic Kubernetes Service (EKS) cost optimization pillars define essential design considerations, assisting you in assessing and improving AWS-deployed applications.
As per AWS, the four pillars cover the following areas:
- Define and enforce cost allocation tagging.
- Define metrics, set targets, and review at a reasonable cadence.
- Enable teams to architect for cost via training, visualization of progress goals, and a balance of incentives.
- Assign optimization responsibility to an individual or a team.
2. Understand your utilization
EKS cost optimization is easier with a solid Kubernetes cost monitoring tool. Ideally, it should have a dashboard showing you cost metrics in real time, given that containerized applications scale dynamically.
Here are three metrics that will help you control your EKS costs:
- Daily cloud spend
- Historical cost allocation
- Provisioned vs. requested CPU
Daily cloud spend
A daily cloud spending report is a must-have for comparing actual costs with your monthly budget. How else can you calculate your burn rate?
For example, if your cloud budget is $1000 for the month and you discover that your average daily spend is closer to $70 than $33 (30 days x $33 = $990), the bill you get at the end of the month will be way higher than expected.
Historical cost allocation
When the finance team asks why your cloud bill is higher than you’ve estimated, you can pinpoint the culprit with a historical cost allocation report. One glance lets you identify workloads that are using resources but not doing anything useful and keep wasteful cloud spending in check.
Provisioned vs. requested CPU
You may find a gap if you compare how many CPUs you provision vs. how many you actually request. This gap represents your cloud waste.
Calculating costs per requested CPU allows you to get an accurate picture of your spending when determining which services and workloads are appropriate for your organization’s needs.
3. Rightsize your virtual machines
Selecting the correct VMs will dramatically reduce your EKS costs because you’ll only acquire enough compute resources for your required performance.
However, the process is difficult since you must identify basic requirements before selecting the appropriate instance type and size. This makes it very time-consuming and tedious, especially given that your application’s demands are likely to change over time.
4. Make good use of autoscaling
Kubernetes comes with three different autoscaling mechanisms:
- Horizontal Pod Autoscaler (HPA),
- Vertical Pod Autoscaler (VPA),
- Cluster Autoscaler.
Autoscaling is what keeps your cost low while making sure that your EKS cluster delivers the performance you need. Here are a few best practices for Kubernetes autoscaling:
Avoid conflicts between autoscaling policies
VPA automatically aligns the requests and limits configuration to help teams lower overhead and cut costs. HPA scales out – and more likely up than down.
That’s why it is key to ensure that your VPA and HPA policies don’t interfere with each other when developing clusters for business- or purpose-class tier of service. Take a look at your settings for binning and packing density as well.
Use instance weighted scores
If your workload often requires more compute capacity than you provision, evaluate whether the extra capacity was really needed or if your workload simply consumed it because it was available.
You can weigh instance types and machine sizes when choosing an autoscaling strategy to ensure that you’re not wasting money on unused instances. The idea of instance weighting is useful here, especially if you implement a diversified allocation strategy and take advantage of spot instances.
Use multiple Availability Zones
AWS recommends that users configure multiple Availability Zones and multiple node groups. One way to do this is to create a single node group that spans across multiple Availability Zones.
When you create a single node group, you can scope it to span across multiple AZs. To enable this feature, use the –balance-similar-node-groups command at launch time.
Want to learn more? Read this guide to Kubernetes autoscaling for cloud cost optimization.
5. Set resource requests and limits
Overprovisioning CPU and memory resources will keep the lights on but will ultimately result in overspending. Underprovisioning these resources puts you in danger of CPU throttling and out-of-memory kills.
You may reduce AWS Kubernetes cost by continuously lowering to the bare minimum of nodes by bin-packing pods with an automated solution. This is how you maximize resource utilization.
For example, an automation solution like CAST AI deletes the node from the cluster when it gets empty to help you save on Amazon Web Services resources.
6. Practice scheduling and decommissioning resources
Not all clusters must be active at all times. For example, you might quickly disable a Dev/Test environment while not in use to make your setup cost-effective.
EKS allows you to stop a cluster to prevent unwanted charges from accumulating. You can save compute expenses by shutting down its node pools while retaining objects and cluster data for when you restart it.
And if you don’t want to do it manually anymore (why would you?), check out CAST AI’s cluster scheduler. It will switch your cluster on and off automatically as needed to save costs.
7. Use spot instances
Spot instances allow you to use underutilized AWS capacity at a substantially cheaper cost than on-demand instances. This method works great for workloads that can withstand interruptions.
So, before jumping on this opportunity, take a good look at your EKS cluster and its workloads to see if they’re a good fit for spot instances or if you’re better off running them on on-demand instances.
Ask these questions when examining your workload:
- How much time does the workload need to finish the job?
- Is your workload mission- or time-critical?
- Can it handle interruptions? How are you going to manage them?
- Is it tightly coupled between instance nodes?
To make the most of spot instances and have peace of mind, you need a solution that automatically provisions and manages them. Ideally, it should also move workloads to on-demand instances if no appropriate spot instances are available.
8. Use an automation tool for optimizing EKS costs
AWS offers roughly half a thousand different virtual machines, not to mention other services that might be part of your EKS cluster. Choosing the best resources that balance price and performance is tricky when your workload demands change often.
Luckily, you can use a cloud cost optimization solution that takes some or all of the above tasks off your shoulders. Here’s a short overview of what’s out there to help you take the first step.
- Cost management tools from cloud providers (think AWS Cost Explorer) – these are the first cost management tools most teams pick up. However, they might soon become insufficient – primarily because AWS doesn’t show cost data in real-time but with a significant delay.
- Legacy cloud monitoring tools (for example, Cloudability) – these work well if all you require is increased visibility into your cloud spend. But they don’t offer any automation to seriously lower your cloud bill – it’s all down to manual configuration.
- Cloud-native optimization and monitoring solutions – they can handle cloud-native cost dynamics, providing teams with all the cost monitoring and optimization features that adjust to cloud resource demands in real time for significant cost savings.
A Practical Example: Automated EKS Cost Optimization
If you’re curious about how EKS cost optimization solutions work, see how CAST AI reduced Amazon EKS costs by 66% for one of our clusters using our tool (aka dogfooding).
TL;DR
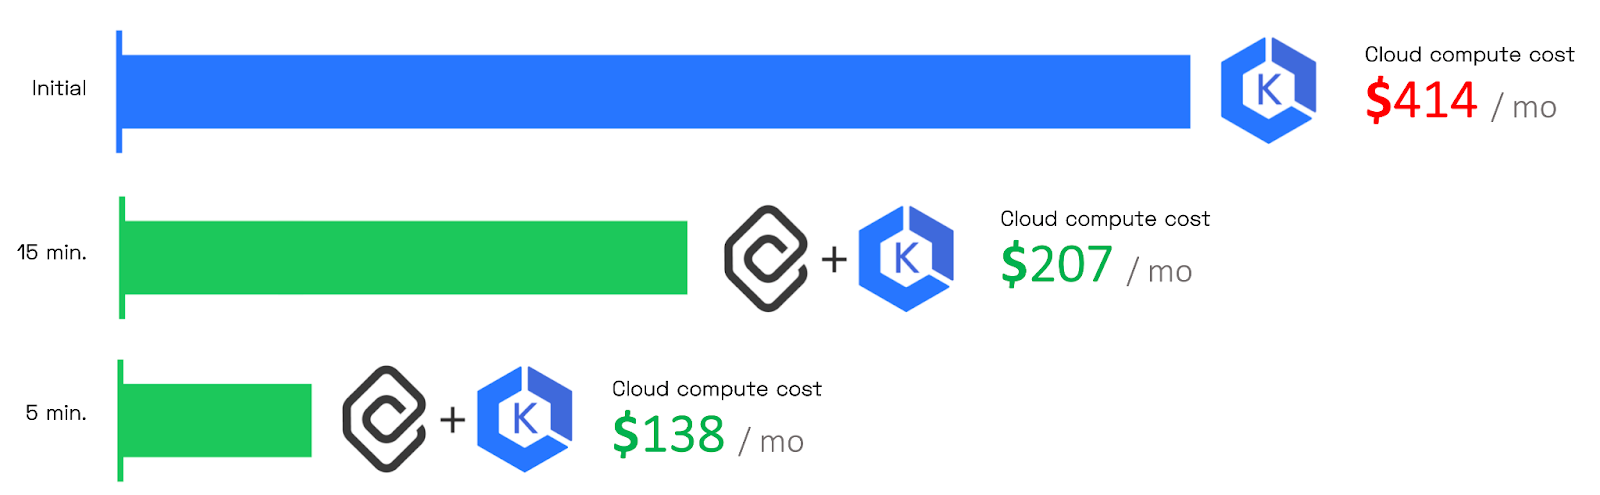
We started by provisioning an e-commerce app (here) on an EKS cluster with six m5 on-demand instances (2 vCPU, 8 GiB) on AWS EKS. We then deployed CAST AI to analyze our application and suggest optimizations. Finally, we activated automated optimization and watched the system continuously self-optimize.
The initial cluster cost was $414 per month. Within 15 minutes, in a fully automated way, the cluster cost went to $207 (a 50% reduction) by reducing six nodes to three nodes. Then, 5 minutes later, the cluster cost went down to $138 per month using spot instances (a 66% reduction).
Step 1: Deploying the app and finding potential savings
We deployed our app in 6 nodes on EKS. Here’s what it looked like before – all the nodes were empty:
The cluster was created via eksctl:
eksctl create cluster –name boutique-blog-lg -N 6 –instance-types m5.large –managed –region us-east-2
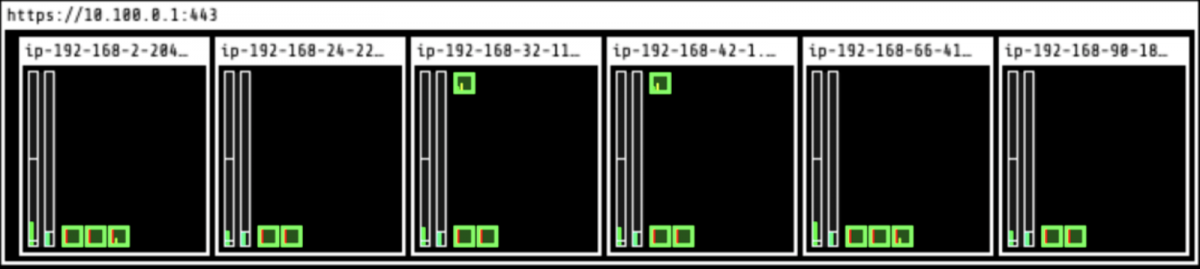
And here’s what it looked like after deployment (we’re using kube-ops-view, a useful open-source project to visualize the pods). The green rectangles are pods:
With Kubernetes, the application’s pods are spread evenly across all the nodes by default. The CPU utilization ranges between 40% and 50%.
Note: All the EKS autoscaling mechanisms have been disabled on purpose since CAST AI will substitute them.
Now it’s time to connect the EKS cluster to CAST AI. We created a free account on CAST AI and selected the Connect your cluster option.
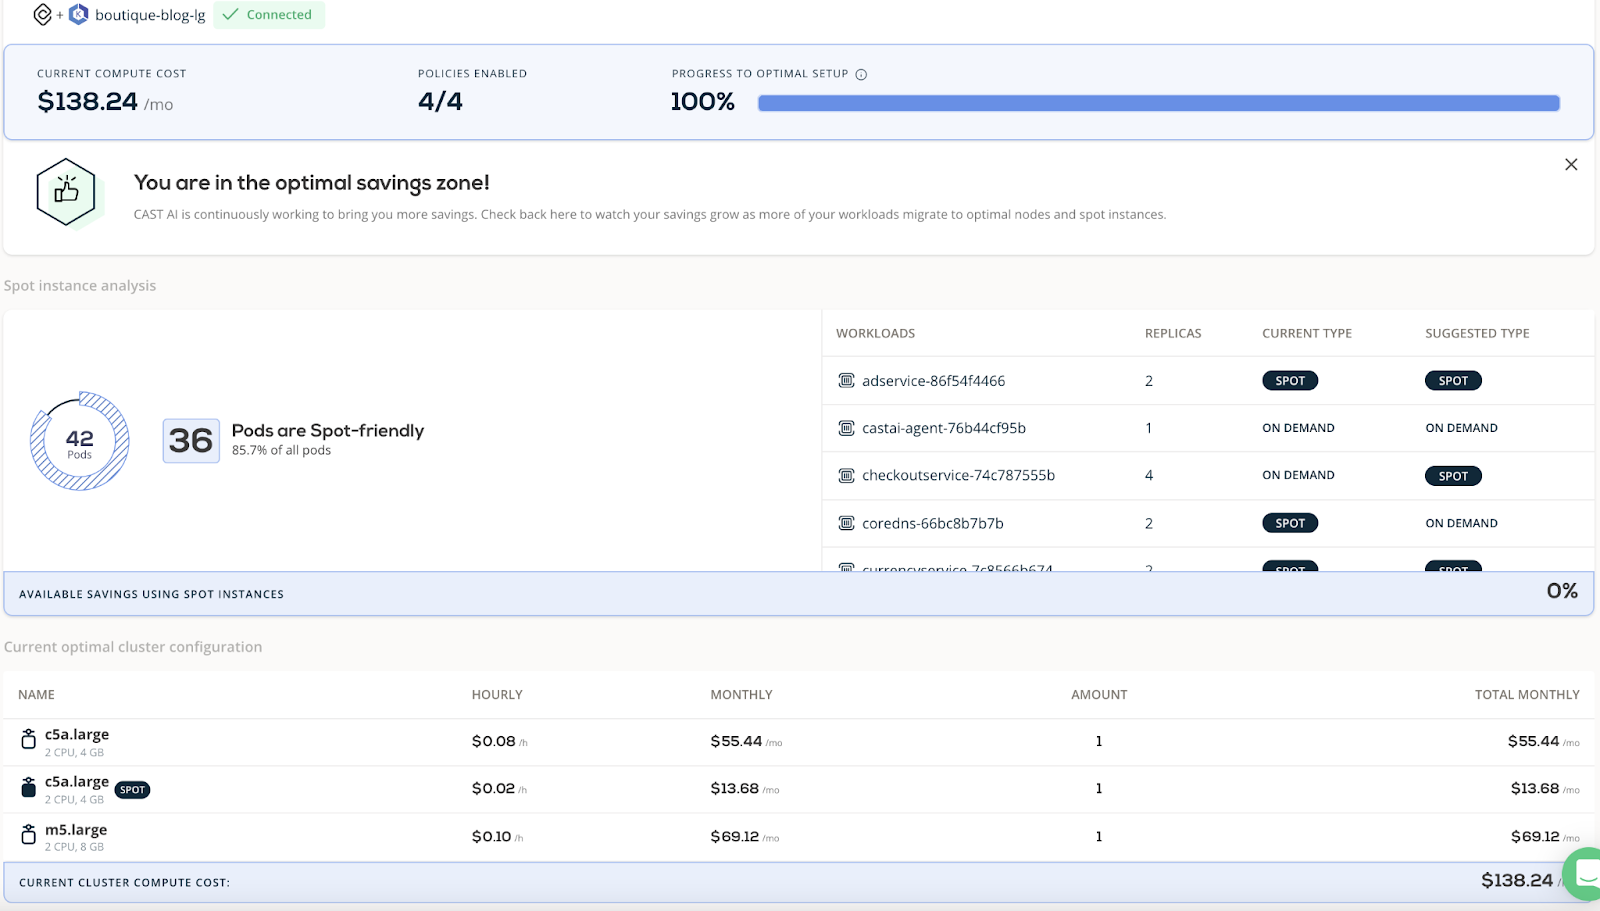
The CAST AI agent analyzed the EKS cluster (learn more about how it works) and generated a savings report:
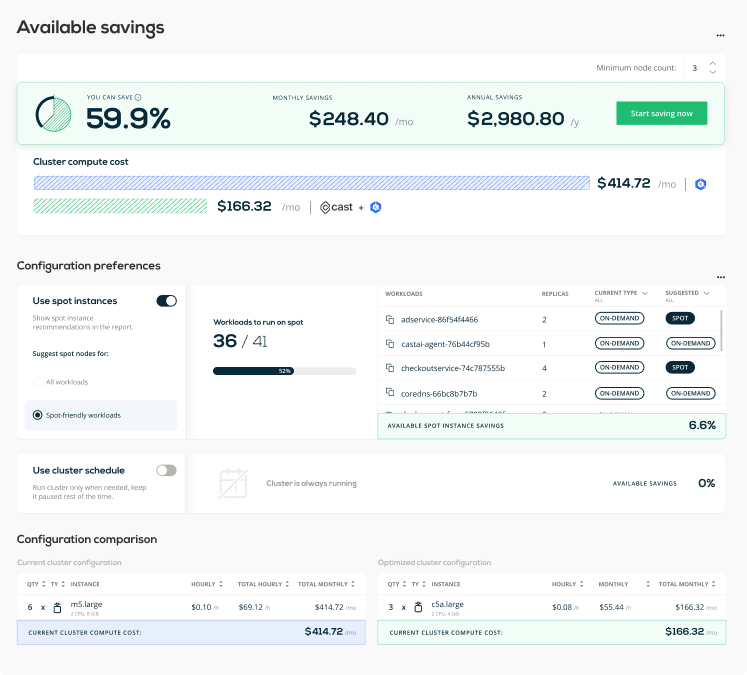
A spot-only cluster generally brings maximum savings, spot-friendly clusters are balanced, and no spot usage brings the least savings.
If we switched 6 m5.large instances to what CAST AI recommends – 3 c5a.large – we could reduce the bill by almost 60%. With spot instances, we could get even higher savings (66.5%). Sounds like a plan!
Step 2: Activating the cost optimization
We need to run the onboarding script to start the automated optimization. To do this, CAST AI needs additional credentials as outlined here.
Step 3: Enabling policies
We can allow CAST AI to manage the whole cluster or just some workloads. Next, we turn on all the relevant policies and Autoscaler settings.
Here’s a short overview of what you can find on this page:
Unscheduled pods policy
This policy automatically adjusts the size of a Kubernetes cluster, so that all the pods have a place to run. This is also where we turn the spot instance policy on and use spot fallback to make sure workloads have a place to run when spot instances get interrupted.
Node deletion policy
This policy automatically removes nodes from the cluster when they no longer have workloads scheduled for them. This allows our cluster to maintain a minimal footprint and greatly reduces its cost. We can also enable Evictor, which continuously compacts pods into fewer nodes – creating a lot of cost savings!
CPU limit policy
This policy keeps the defined CPU resources within the defined limit. The cluster can’t be beyond the maximum and minimum thresholds.
We enabled Evictor and set it to work.
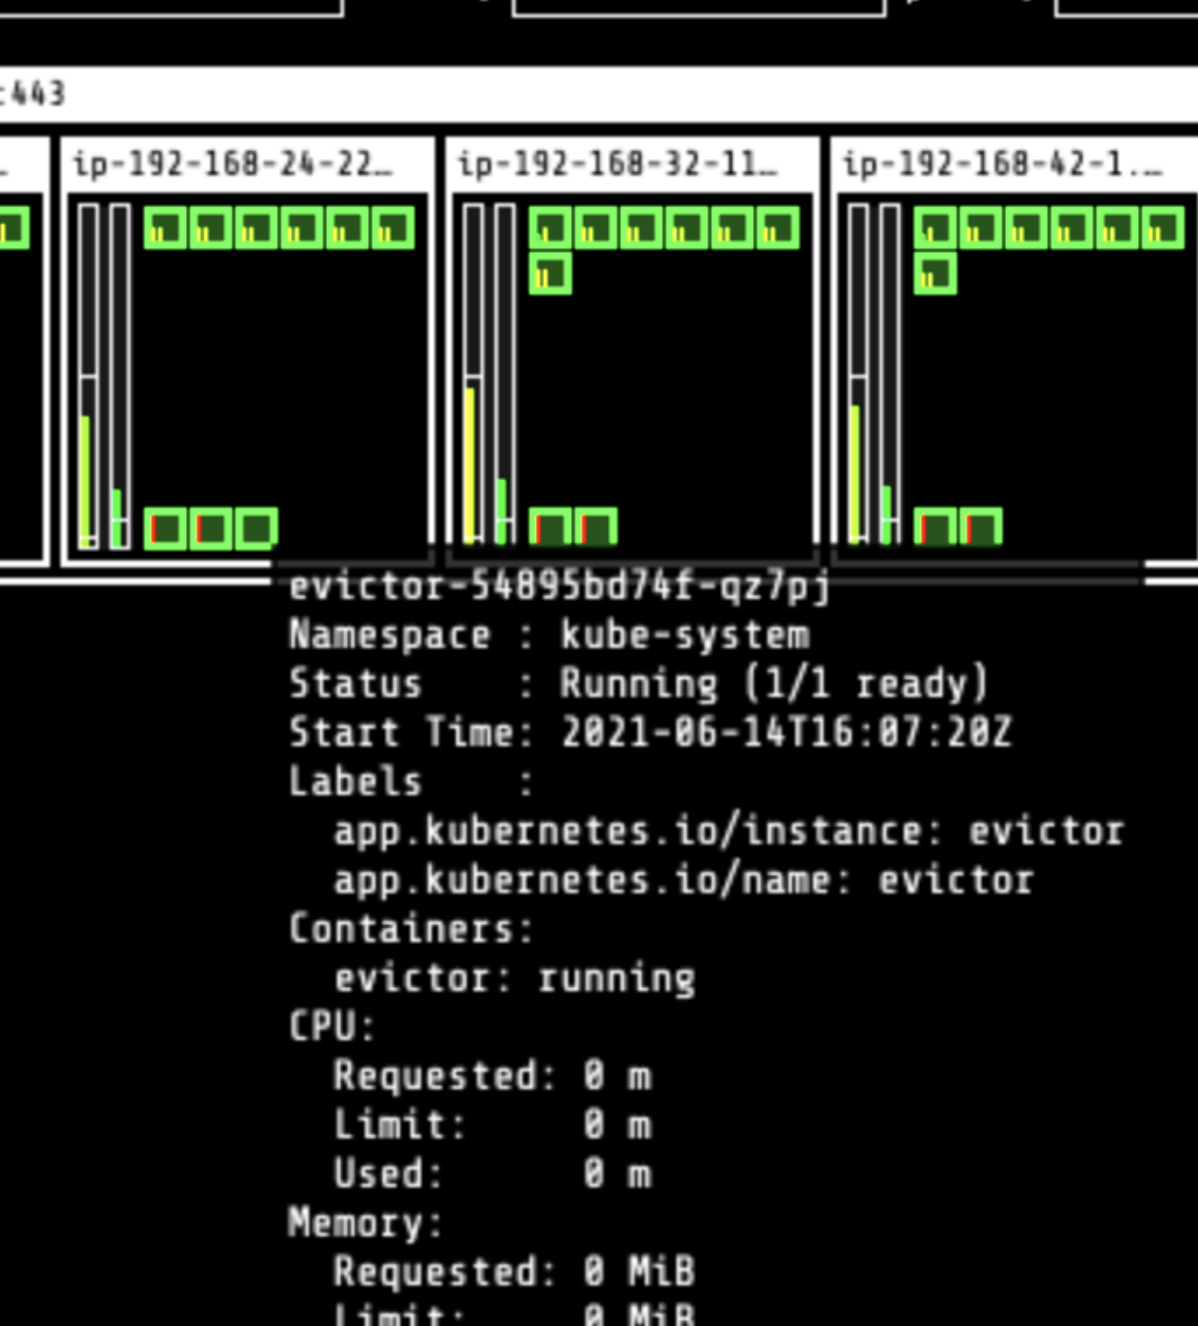
This is what Evictor looks like in action:
- One node (in red below) is identified as a candidate for eviction.
- Evictor automatically moves the pods to other nodes, bin packing the cluster.
- Once the node becomes empty, it’s deleted from the cluster.
- Go back to step 1.
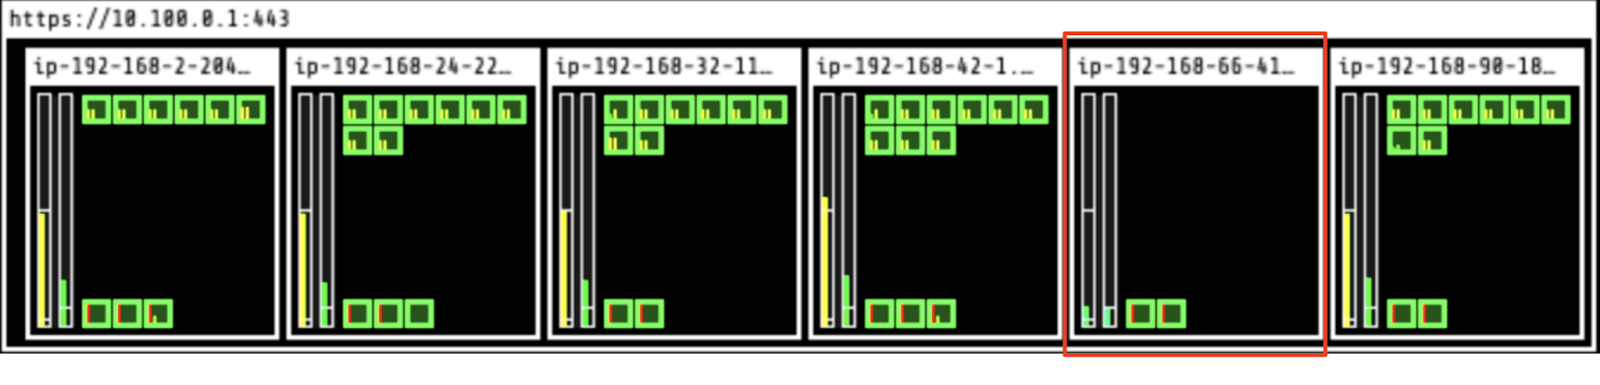
One node is deleted:

Here are the Evictor logs:
time="2021-06-14T16:08:27Z" level=debug msg="will try to evict node \"ip-192-168-66-41.us-east-2.compute.internal\""
time="2021-06-14T16:08:27Z" level=debug msg="annotating (marking) node \"ip-192-168-66-41.us-east-2.compute.internal\" with \"evictor.cast.ai/evicting\"" node_name=ip-192-168-66-41.us-east-2.compute.internal
time="2021-06-14T16:08:27Z" level=debug msg="tainting node \"ip-192-168-66-41.us-east-2.compute.internal\" for eviction" node_name=ip-192-168-66-41.us-east-2.compute.internal
time="2021-06-14T16:08:27Z" level=debug msg="started evicting pods from a node" node_name=ip-192-168-66-41.us-east-2.compute.internal
time="2021-06-14T16:08:27Z" level=info msg="evicting 9 pods from node \"ip-192-168-66-41.us-east-2.compute.internal\"" node_name=ip-192-168-66-41.us-east-2.compute.internal
I0614 16:08:28.831083 1 request.go:655] Throttling request took 1.120968056s, request: GET:https://10.100.0.1:443/api/v1/namespaces/default/pods/shippingservice-7cd7c964-dl54q
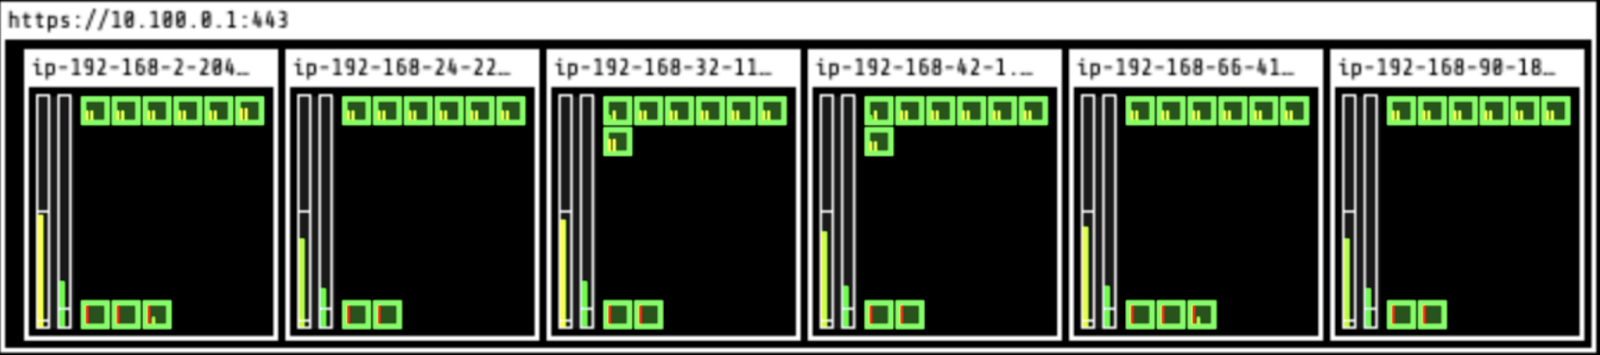
time="2021-06-14T16:08:44Z" level=debug msg="finished node eviction" node_name=ip-192-168-66-41.us-east-2.compute.internaAnd now the second and third nodes were evicted – three nodes remain:
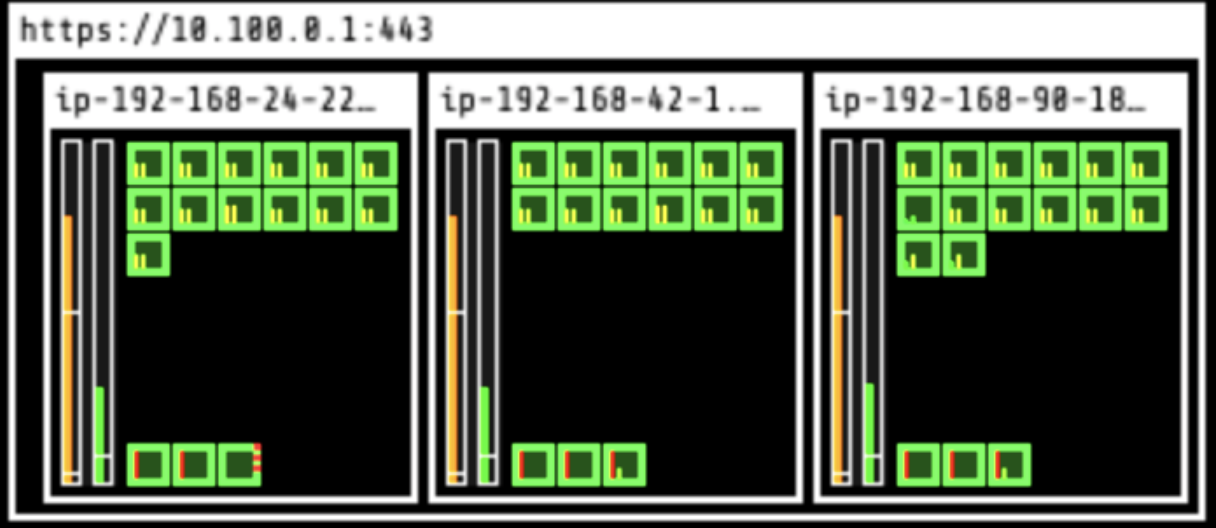
After about 10 minutes, Evictor deleted three nodes and left three nodes running. Note that CPUs are now at a much healthier 80% rate.
The cost of this cluster is now $207.36 per month – half of the initial cost of $414 per month.
We managed to achieve 80% of the projected savings. This is what we see in the dashboard:
Step 4: Running the full rebalancing for continuous optimization
Steps 1, 2, and 3 are fully automated. CAST AI gradually shrinks the cluster by eliminating waste and overprovisioning. It does so by bin packing pods and emptying nodes one by one.
From that moment on, the cluster is optimized, and Evictor will continuously look for further optimization opportunities over time.
The next step is to run the full rebalancing where CAST AI assesses all the nodes in the cluster and then replaces some (or all) with the most cost-efficient nodes available, which meet our workload requirements.
The nodes are cordoned:

The first two nodes are drained, and the AI engine selects the most appropriate instance type for these nodes:
The cluster now has only two nodes and costs $138 per month. It’s hard to believe that we started with a monthly EKS bill of $414.72. Talk about some significant cost savings!
EKS cost optimization via automation just works
Moving from a non-optimized setup to a fully-optimized one was a breeze. CAST AI analyzed the setup, found opportunities for savings, and swiftly optimized our own cluster in 15 minutes. We cut the EKS costs by half in 15 minutes, from $414 to $207.
We then activated advanced savings by asking CAST AI to replace nodes with more optimized nodes and achieved further savings on the cloud infrastructure costs, ending up with a $138 bill.
Run the free CAST AI Savings Report to check how much you could potentially save on EKS costs. It’s the best starting point for any journey into cloud cost optimization.


