
When you’re running a relatively small cluster, you might get away with having no structure in place for it. But with time, your cluster will inevitably scale to dozens of pods and hundreds of containers. If you keep running them carefree, you’ll deal with a mess sooner rather than later. Here’s your golden ticket to get out of this chaos: Kubernetes namespace.
By keeping your cluster organized with namespaces, labels, and annotations, you’ll avoid the performance, maintenance, and security issues that come together in a package with the lack of control over the deployed objects and services.
Keep reading to learn how to use Kubernetes namespaces to organize your clusters and optimize them for cost.
First, let’s quickly recap how namespaces work
When you create a physical Kubernetes cluster, you’ll get one workable namespace on top of it by default. This is where you create Kubernetes objects. But as your project grows, having a single namespace will quickly become an issue.
A namespace functions like a virtual cluster, and Kubernetes lets you create multiple such virtual clusters in a single physical cluster. By configuring multiple namespaces, you’ll free your team members from the burden of working with a single namespace. This will improve your cluster’s manageability, performance, and security.
But don’t rush away to create a bunch of random namespaces. What you need is a namespace strategy.
How do you build a namespace strategy? You’re not going to like this, but “it depends.”
I’ve seen many different namespace strategies out there. They usually depend on factors like team size, team structure, and project complexity.
A small team dealing with a few microservices can easily get away with that one namespace you get in Kubernetes by default. But the same setup will cause massive issues in a fast-growing company with multiple services. In this scenario, it’s better to create sub-teams and give each a separate namespace.
Which projects or teams need more than one Kubernetes namespace?
In larger companies, there may be many widely dispersed teams. Team A might be working on a project that Team B isn’t even aware of. But they all use resources in the same Kubernetes namespace. When Team A deploys its project to that namespace, it risks impacting the work of Team B.
What these teams need is isolation and team-based access security on separate namespaces. Managers can even add resource quotas per namespace to make sure that an incredibly resource-hungry application doesn’t exhaust all the cluster capacity, affecting resources from other teams.
This is just one of the many problems a single namespace can cause in a larger company. Keeping up with frequent changes, dealing with third parties that contribute to the platform, and coordinating all of these resources become a massive challenge to DevOps folks.
Add to this approaches like service mesh or multi-cloud CD, and you got yourself into a fix. You need multiple namespaces to solve this.
Using namespaces just makes sense – especially considering that you get these benefits:
- Adding more namespaces lets teams or projects work in their virtual clusters without impacting each other’s work.
- You also improve role-based access controls (RBAC) by limiting users and processes to specific namespaces.
- Namespaces help you divide a cluster’s resources between various teams with resource quotas.
- You can use namespaces to easily separate the development, testing, and deployment phases, keeping the entire lifecycle on one cluster.
Most importantly (at least for the purpose of this article), namespaces open the door to resource control.
You can use them to define resource limits, ensuring that each namespace can access a specific amount of CPU and memory resources. This, in turn, allows you to separate cluster resources across multiple projects and ensure that every project has the resources it needs and doesn’t interfere with the resources you set for other projects.
How to use namespaces in your project
Create a Kubernetes cluster, and you’ll get three namespaces out of the box. Want to see what they are? Run this command:
> kubectl get namespacesThis is what you’ll get:
NAME          STATUS   AGE

default       ACTIVE   2d

kube-system   ACTIVE   2d

kube-public   ACTIVE   2d
What are they all for?
- kube-system – this namespace is reserved for the Kubernetes engine; you’re not supposed to use it.
- kube-public – this is where Kubernetes stores public access data (for example, cluster information).
- default – you can use this namespace to create apps and services.
If you create a new cluster component and don’t specify a namespace for it, Kubernetes will create it in the default namespace. But as I mentioned, the default namespace might work only if you have a small team working on a small system.
How do you create a new Kubernetes namespace?
A single kubectl command is what you need:
> kubectl create namespace devYou can also create a new namespace using a YAML configuration file. Doing it this way is a good idea because you’ll have it logged in the history in the configuration file repository of objects created in a cluster.
Here’s how you create a namespace with a configuration file:
kind: Namespace
apiVersion: v1
metadata:
  name: dev
  labels:
     name: dev
> kubectl apply -f dev.yamlEasy!
But here’s where things get a little tricky: each project you run comes with its own lifecycle. Mixing development and production resources is a bad idea, so your cluster will need a more nuanced namespace strategy. For example, you can split your cluster into development, staging, and production environments.
Check out Kubernetes docs for more details.
Here’s how namespaces help you in cost allocation
If you want to gain more control of that mounting cloud bill you’re struggling to reduce, cost visibility is the first step. Allocating resource costs within a Kubernetes environment is the first step.
It makes sense to allocate costs at the level of workload by the individual container. Once that’s done, you can assign costs to specific teams, departments, and even individual developers by aggregating different workload collections.
Here’s an example framework for allocating costs at the workload level:
1. Start by measuring resources
Depending on the resource, you can either rely on the Kubernetes scheduler to measure the average amount of resources consumed or turn to your cloud provider to check the amount of provisioned resources (for example, load balancers and persistent volumes).
You’ll also need different metrics for particular resources. For example, it’s smart to measure CPU and memory allocation by the maximum level of request and usage. This is how you can check the number of resources reserved by the Kubernetes scheduler.
The Kubernetes API can measure the period of time during which a given resource (like memory, CPU, and GPU) was consumed by checking the amount of time spent in the running state for this resource. Teams should also reconcile this with data from the cloud provider – the duration when a particular resource was provisioned.
2. Check resource pricing
Another point relates to resource pricing. Cloud providers offer hundreds of virtual machines where you can run your cluster. AWS alone has more than 500 EC2 instance types with completely different pricing per hour.
3. Allocate cloud waste if it’s unavoidable
It’s common for teams to end up with idle capacity. When allocating resources, you can decide which team should pay for which idle resources. Assigning such costs to the team, which is responsible for making the provisioning decision, incentivizes engineers to pay more attention to costs.
Once you allocate costs across individual workloads, you can easily aggregate them using any Kubernetes concept – starting with Kubernetes namespace and labeling to annotation and controller.
Mapping your Kubernetes cloud spend to a team, product or department is a time-consuming task if you do it manually. Luckily, there are solutions on the market that do it for you.
4. Use this free monitoring tool to track Kubernetes costs by namespaces
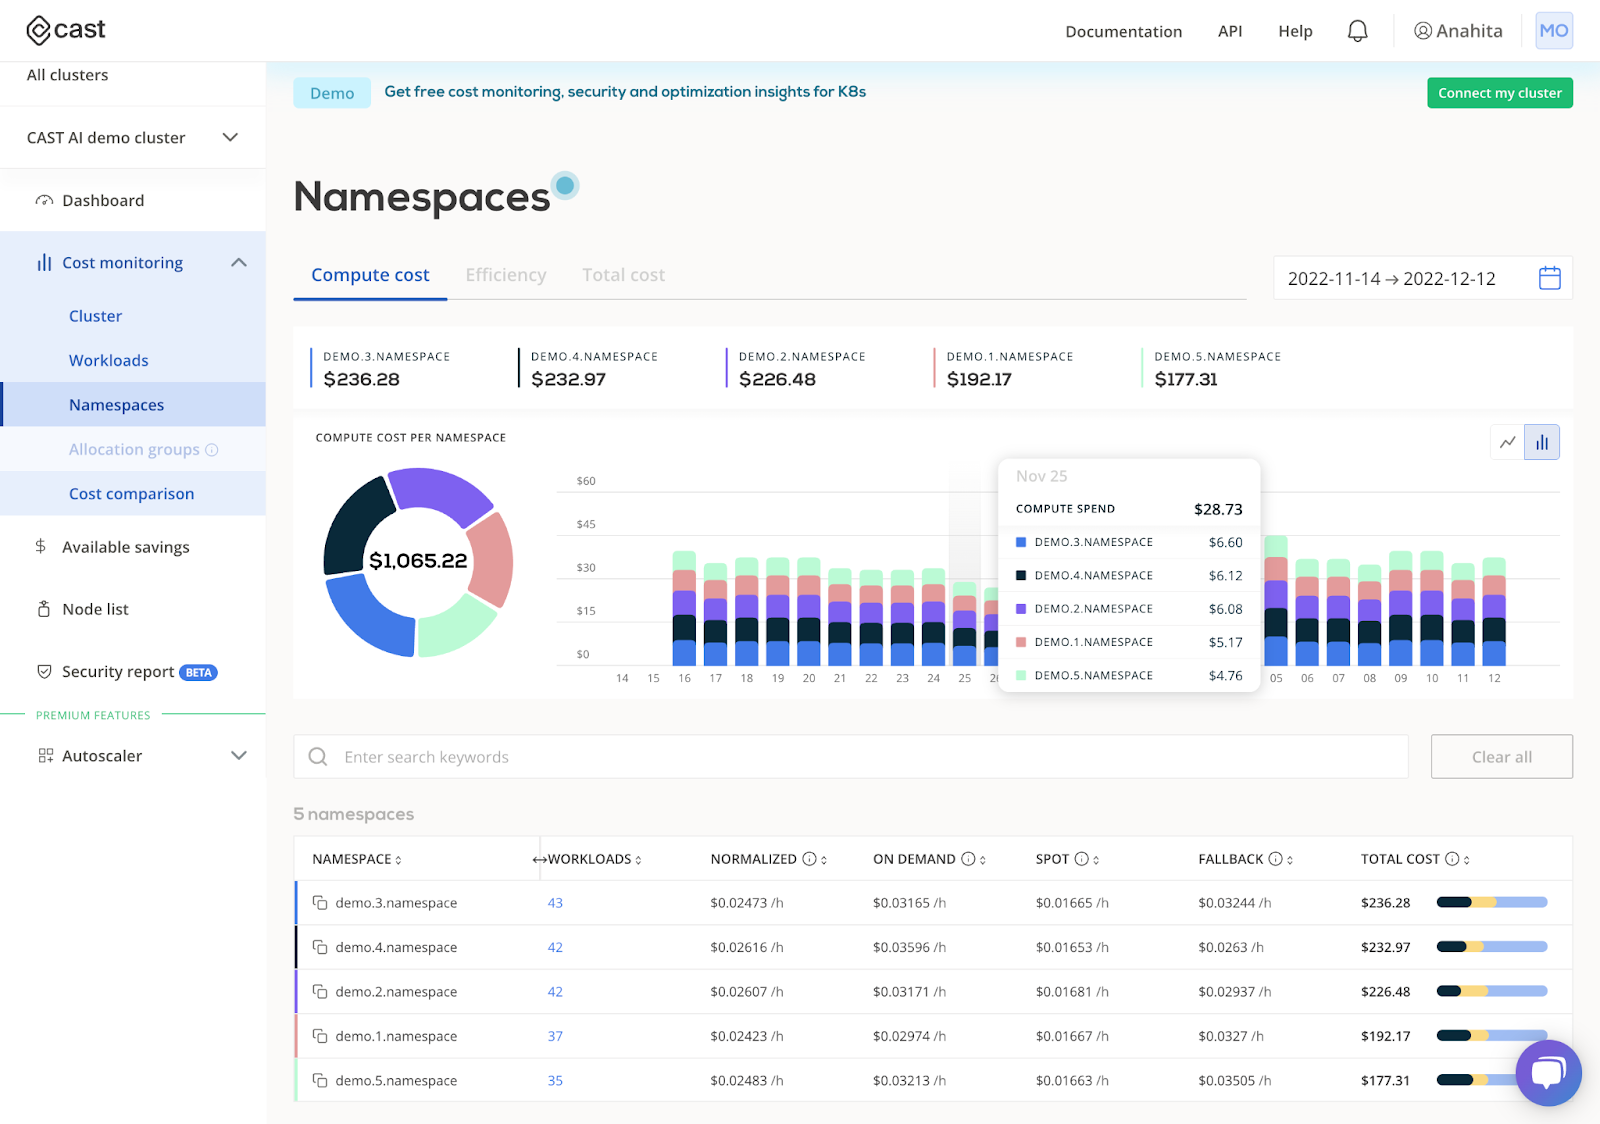
Kubernetes cost monitoring tool lets you check the costs of any of your workloads in real time and use any concept that works for you. Using the CAST AI free cost monitoring module, you can filter compute costs by namespaces and easily track cloud costs by team or service.
Connect your cluster and see how much you’re spending in real time.
CAST AI clients save an average of 63% on their Kubernetes bills
Connect your cluster and see your costs in 5 min, no credit card required.
FAQ
A Kubernetes namespace lets engineers isolate groups of resources within one Kubernetes cluster. Namespaces are used in environments counting many users spread across multiple teams or projects.
Namespaces also provide a scope for resource names, which need to be unique within a namespace, but not across namespaces. You can’t nest namespaces inside one another, and each of your Kubernetes resources can only be in one namespace.
In Kubernetes, a pod is a unit of replication in a Kubernetes cluster. A single cluster can contain many pods, which may be related or unrelated, and grouped under namespaces. A namespace, on the other hand, offers a mechanism to organize a cluster into virtual sub-clusters, which comes in handy when different teams or projects share that Kubernetes cluster.
Kubernetes namespaces have many helpful use cases for engineers and teams:
– Namespaces let you isolate resources between teams and projects so developers can apply changes without worrying that they might affect the work of others.
– They improve security by enhancing role-based access controls (RBAC), which limit users and processes to specific namespaces.
– You can control cloud resources better by adding resource quotas to teams and ensuring that every namespace has access to a specified amount of CPU and memory.
– Namespaces offer a great way to separate the development, testing, and deployment of containerized applications. That way, your cluster can include the entire lifecycle.


