EKS opens the doors to the performance, scalability, and availability you need for your cluster. But it’s easy to lose control of its costs. Luckily, you can do a few things to optimize your EKS cluster and get the performance you need at a lower price. Here’s a guide to help you reduce your EKS costs.

5 tips to help you optimize your EKS cluster
1. Understand your utilization with these metrics
Getting the hang of your cloud bill can be challenging, so it pays to invest in a Kubernetes cost monitoring tool. Ideally, it should have a dashboard showing you cost metrics in real time, given that containerized applications scale dynamically.
But having the best cost-monitoring solution isn’t enough if you have no idea which metrics to keep an eye on. Here are 3 that will help you control your EKS cluster costs:
Daily cloud spend
A daily cloud spending report is a must-have for compare actual costs with your monthly budget. How else can you calculate your burn rate?
For example, if you set a cloud budget of $1000 for the month and your average daily spend is closer to $70 than $33 (30 days x $33 = $990), the bill you get at the end of the month will be way higher than expected.
Historical cost allocation
When the finance team asks why your cloud bill is higher than you’ve estimated, you can pinpoint the culprit with a historical cost allocation report. One glance lets you identify workloads that are using resources but not doing anything useful and keep wasteful cloud spending in check.
This is especially important since the top three cloud providers don’t offer access to data in real time. Third-party solutions can fill this gap and allow you to keep track of costs instantly, so you can spot cost spikes and keep your cloud expenses under control. That works best if you serve cost data in a tool they already use anyway – for example, the industry-standard observability tool Grafana.
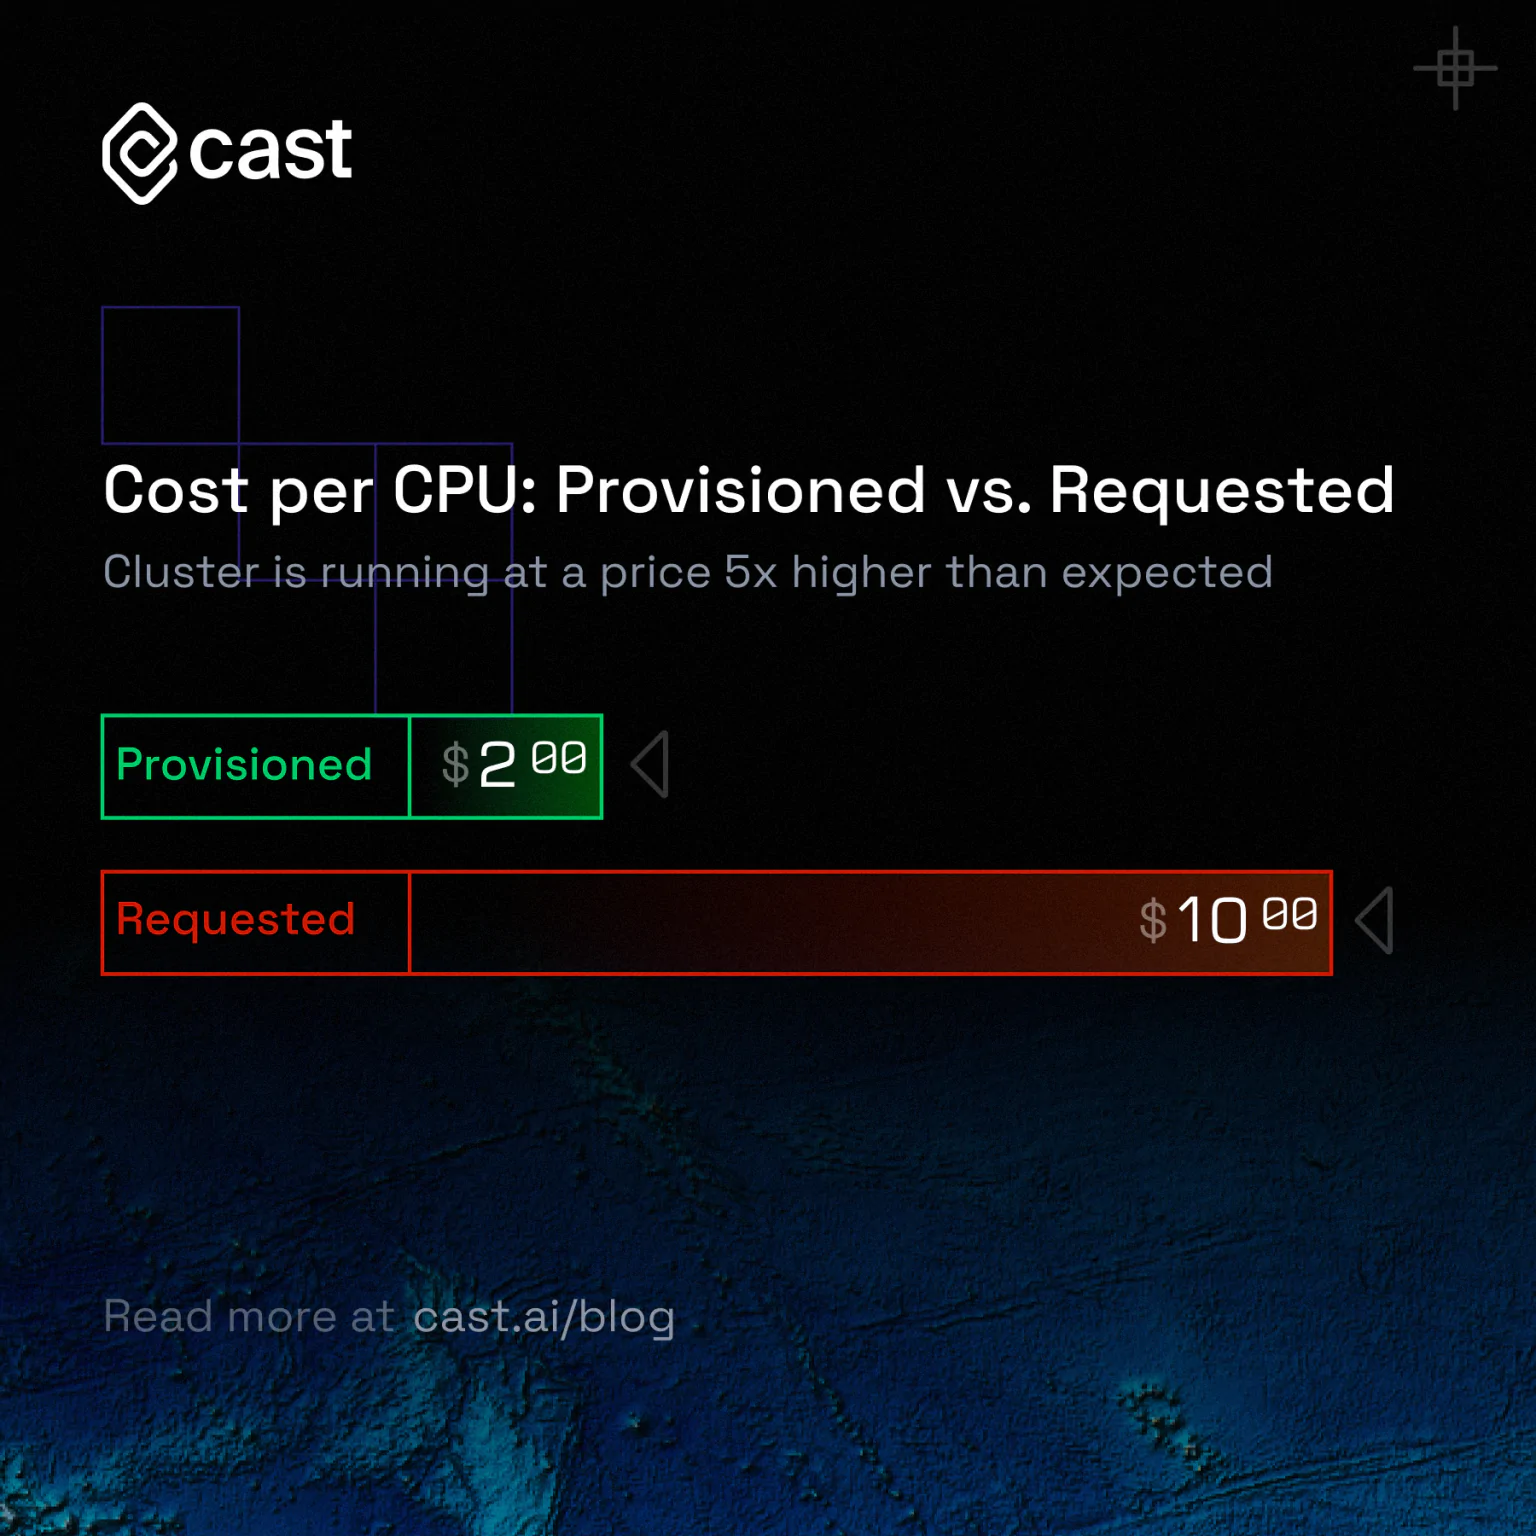
Provisioned vs. requested CPU
It’s good to track the cost per provisioned and requested CPU. Why differentiate between them? If you compare how many CPUs you provision vs. how many you actually request, you may find a gap. This gap represents your cloud waste.
Smaller clusters tend to exhibit this behavior more frequently: as more workloads are added to a cluster, each new workload consumes fewer resources and may end up getting charged for resources that aren’t being used.
Calculating costs per requested CPU allows you to get an accurate picture of your spending when determining which services and workloads are appropriate for your organization’s needs.
2. Pick the right size and type of virtual machines
For great performance, you need to provision only as much as your workload really needs. This includes taking into account CPU count and architecture, memory, storage, and network.
A cheap instance might seem like a great idea at first glance – until you start running a memory-intensive application and get all kinds of performance issues. Picking the cheapest option will slash your costs, but it might eventually affect your reputation.
Picking the right virtual machines for your EKS clusters is a hard task when AWS offers several hundred EC2 instance types matching a wide range of use cases and with different CPU, storage, memory, and networking capacity combinations. On top of that, each VM type comes in one or more sizes.
Before settling on a machine type, consider benchmarking it to get a real picture of its capabilities. Benchmarking verifies performance by dropping the same workload into every machine type and checking its performance. You can probably imagine how much time that would take you – luckily, cloud automation solutions can make the instance selection for you.
3. Take advantage of Kubernetes autoscaling
Your EKS cluster runs on Kubernetes, which comes with three different autoscaling mechanisms;
- Horizontal Pod Autoscaler (HPA),
- Vertical Pod Autoscaler (VPA),
- Cluster Autoscaler.
Autoscaling is what keeps your cost low while making sure that your EKS cluster delivers the performance you need. Here are a few best practices for Kubernetes autoscaling:
Avoid conflicts between autoscaling policies
VPA automatically aligns the requests and limits configuration to help teams lower overhead and cut costs. HPA scales out – and more likely up than down.
That’s why it is key to ensure that your VPA and HPA policies don’t interfere with each other when developing clusters for business- or purpose-class tier of service. Take a look at your settings for binning and packing density as well.
Mix instances
A mixed-instance strategy allows you to use different VM types that are more cost-efficient and just good enough for some of your workloads – but not high-throughput, low-latency ones.
Depending on the workload, it’s often fine to pick the least expensive machines. Alternatively, you can use fewer machines with higher specs. This is a good strategy for shrinking your Kubernetes costs – every node requires Kubernetes to be installed on it and adds a little overhead.
Still, expect scaling challenges if you use mixed instances since each of them uses a different type of resource. You can scale VMs in your autoscaling groups up using metrics such as CPU or network utilization – but prepare for inconsistent metrics.
Use instance weighted scores
If your workload often requires more compute capacity than you provision, evaluate whether the extra capacity was really needed or if your workload simply consumed it because it was available.
You can weigh instance types and machine sizes when choosing an autoscaling strategy to ensure that you’re not wasting money on unused instances. The idea of instance weighting is useful here, especially if you implement a diversified allocation strategy and take advantage of spot instances.
Use multiple Availability Zones
AWS recommends that users configure multiple Availability Zones and multiple node groups. One way to do this is to create a single node group that spans across multiple Availability Zones.
When you create a single node group, you can scope it to span across multiple AZs. To enable this feature, use the –balance-similar-node-groups command at launch time.
Want to learn more? Read this guide to Kubernetes autoscaling for cloud cost optimization.
3. Benefit from cost-efficient spot instances
Spot instances offer discounts of up to 90% off the on-demand pricing for your Kubernetes workloads. There’s just one catch: the cloud provider might reclaim that capacity at any moment.
So, before jumping on this opportunity, take a good look at your EKS cluster and its workloads to see if they’re a good fit for spot instances.
Assess if your workload is spot-ready
Ask these questions when examining your workload:
- How much time does the worload need to finish the job?
- Is your workload mission- or time-critical?
- Can it handle interruptions? How are you going to manage them?
- Is it tightly coupled between instance nodes?
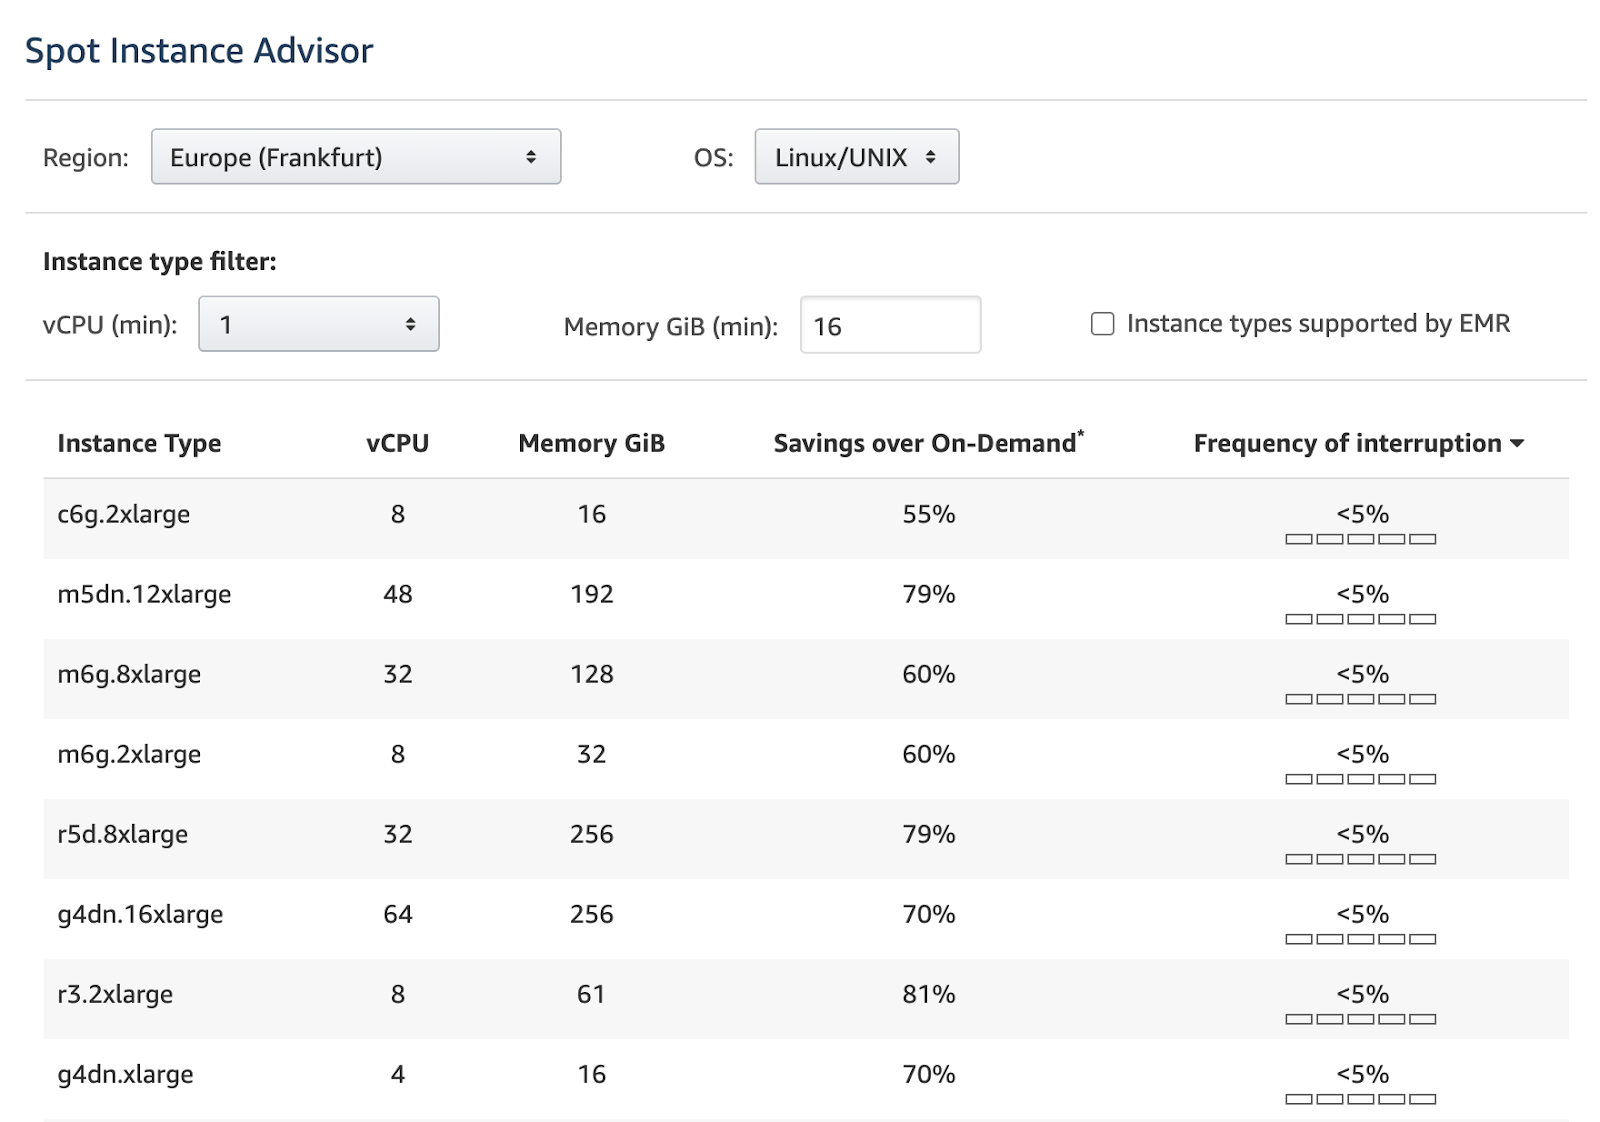
Pick your spot instances
When picking spot instances, consider going for slightly less popular ones. It’s simple – if there’s less demand for your instance, it’s also less likely to get interrupted.
Before picking an instance, check its frequency of interruption. It’s the rate at which machines reclaimed capacity during the trailing month.
Bid on spot instances
Set a maximum bid for the price you’re willing to pay for a spot instance. Spot instances are available when the marketplace price is lower than or equal to your bid. The rule of thumb is setting the max price to the on-demand rate for a given instance.
Set up spot fleets
To increase your chances of obtaining spot instances, set up spot fleets. Spot fleets allow you to request multiple VM types at the same time. Prepare to pay the maximum price per hour for all of the instances in a fleet instead of a specific spot pool (a set of instances of the same type and with the same OS, availability zone, and network platform).
4. Use an automation tool
AWS offers roughly half a thousand different virtual machines, not to mention other services that might be part of your EKS cluster. Choosing the best resources that balance price and performance is tricky when your workload demands change often.
Luckily, you can use a cloud cost optimization solution that take some or all of the above tasks off your shoulders. Here’s a short overview of what’s out there to help you take the first step.
- Cost management tools from cloud providers (think AWS Cost Explorer) – these are the first cost management tools most teams pick up. However, they might soon become insufficient – primarily because AWS doesn’t show cost data in real time but with a significant delay.
- Legacy cloud monitoring tools (for example, Cloudability) – these work well if all you require is increased visibility into your cloud spend. But they don’t offer any automation to seriously lower your cloud bill – it’s all down to manual configuration.
- Cloud-native optimization and monitoring solutions – they can handle cloud-native cost dynamics, providing teams with all the cost monitoring and optimization features that adjust on cloud resource demands in real time.
5. Optimize your EKS cluster automatically
To see the difference automation can make in the life of a cloud operations team, read this case study – it shows how the fintech company Delio reduced its cloud bill and increased engineer productivity with CAST AI.
Explore CAST AI case studies


Leave a reply